

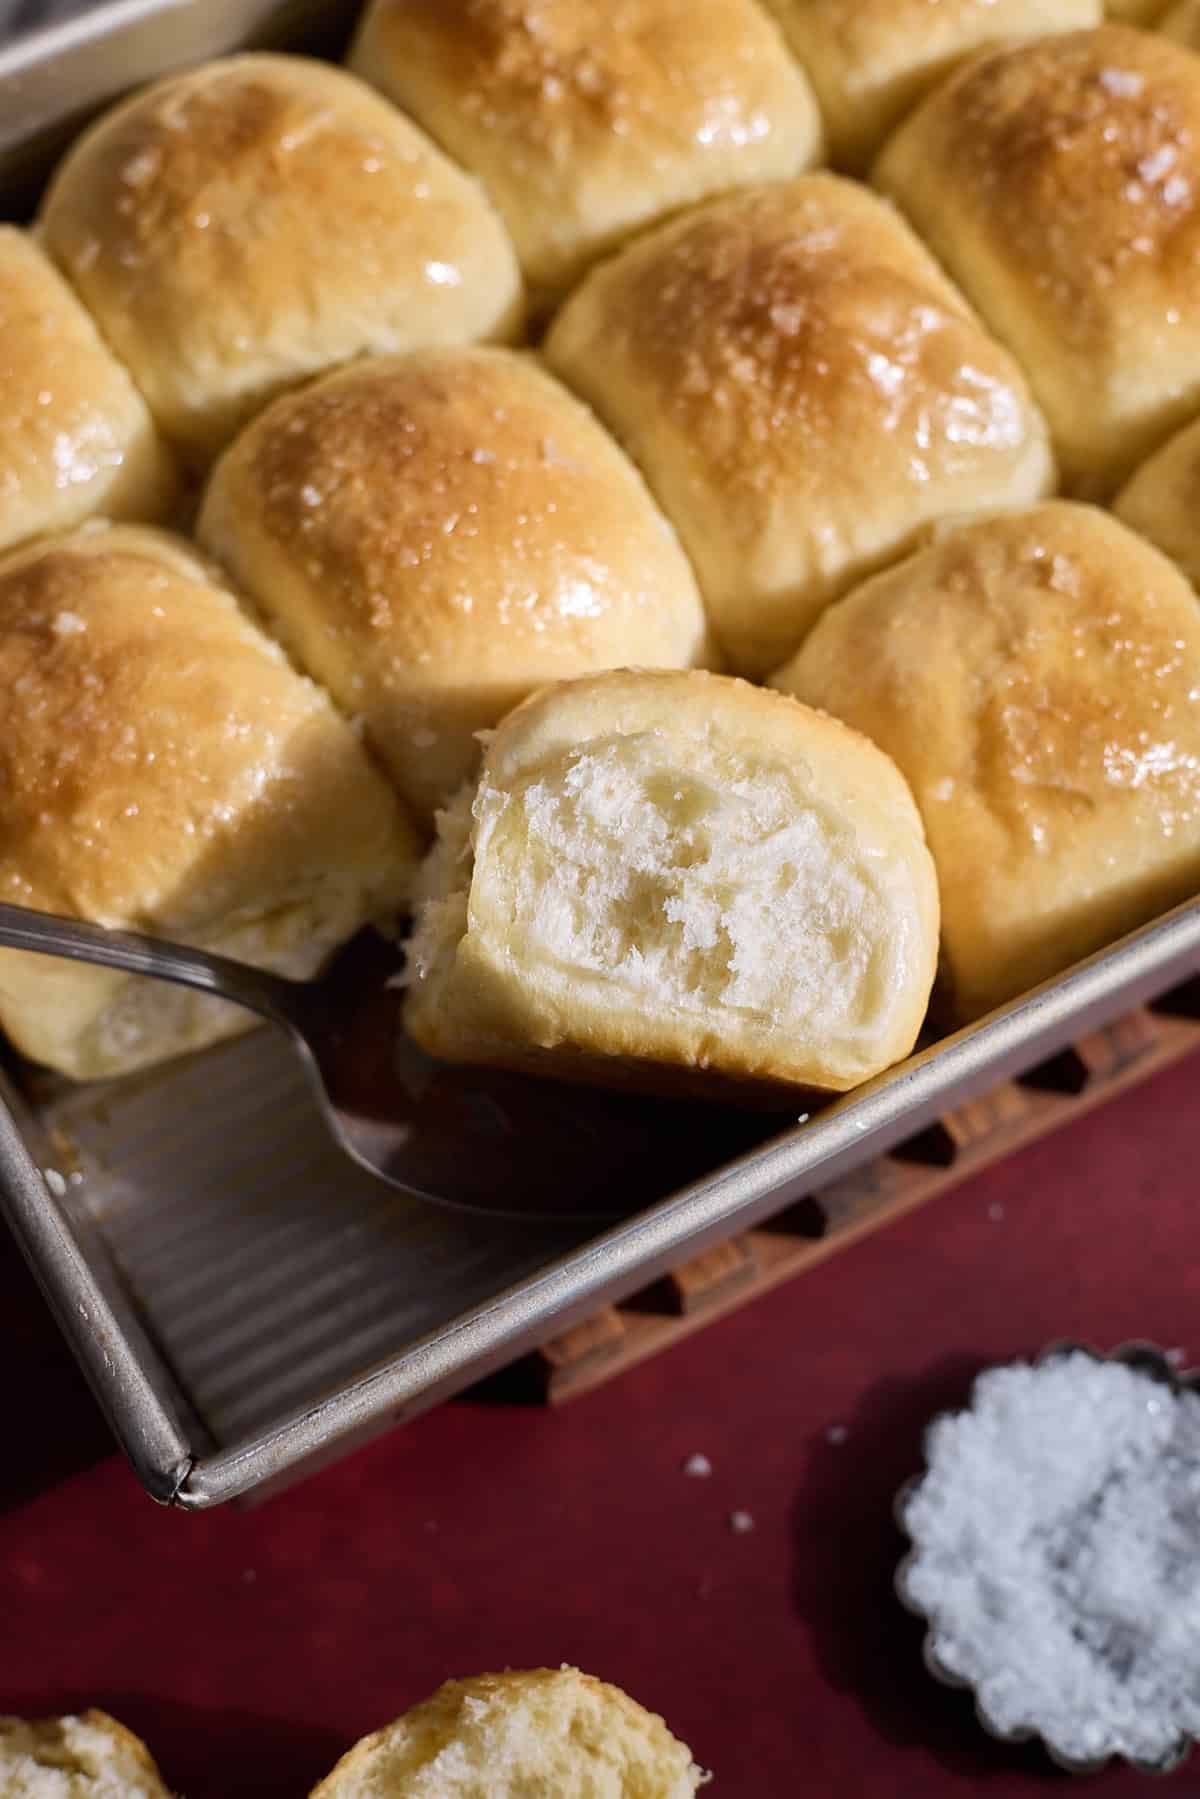
If you're looking for some delicious, super soft dinner rolls, these Sourdough Discard Rolls are perfect for you! These rolls are made with sourdough discard, but you can also modify them to be made with active sourdough starter if you prefer. They're a great side dish with any meal, or for sliders or mini sandwiches!
Jump to:
These are a new family favorite. I've made them several times and they always come out perfect. My family gets excited when they see I'm making these!
- Barbara
Why you'll love this recipe
- These soft and fluffy dinner rolls are brushed with butter for a delicious flavor. And the sprinkle of flaky sea salt really finishes them off!
- Their smaller size makes them a perfect side dish. They're also a great size for sliders or small sandwiches!
- You might also love Sourdough Discard Hawaiian Rolls, Sourdough Discard Garlic Rolls, and Sourdough Discard Brioche Rolls.
- This is an easy to make, same-day recipe and you'll have these Sourdough Discard Rolls on the table in just a few hours!
- You can easily modify this recipe to use active sourdough starter instead of discard, if you prefer.
- These rolls freeze well, so you can enjoy some now, and freeze the rest for later!
- Freezing a few bakes ahead of time? These Sourdough Discard Bagels also freeze well!
Ingredients
As long as you have sourdough discard, you're halfway there! You'll only need a few ingredients to make these Sourdough Discard Rolls.
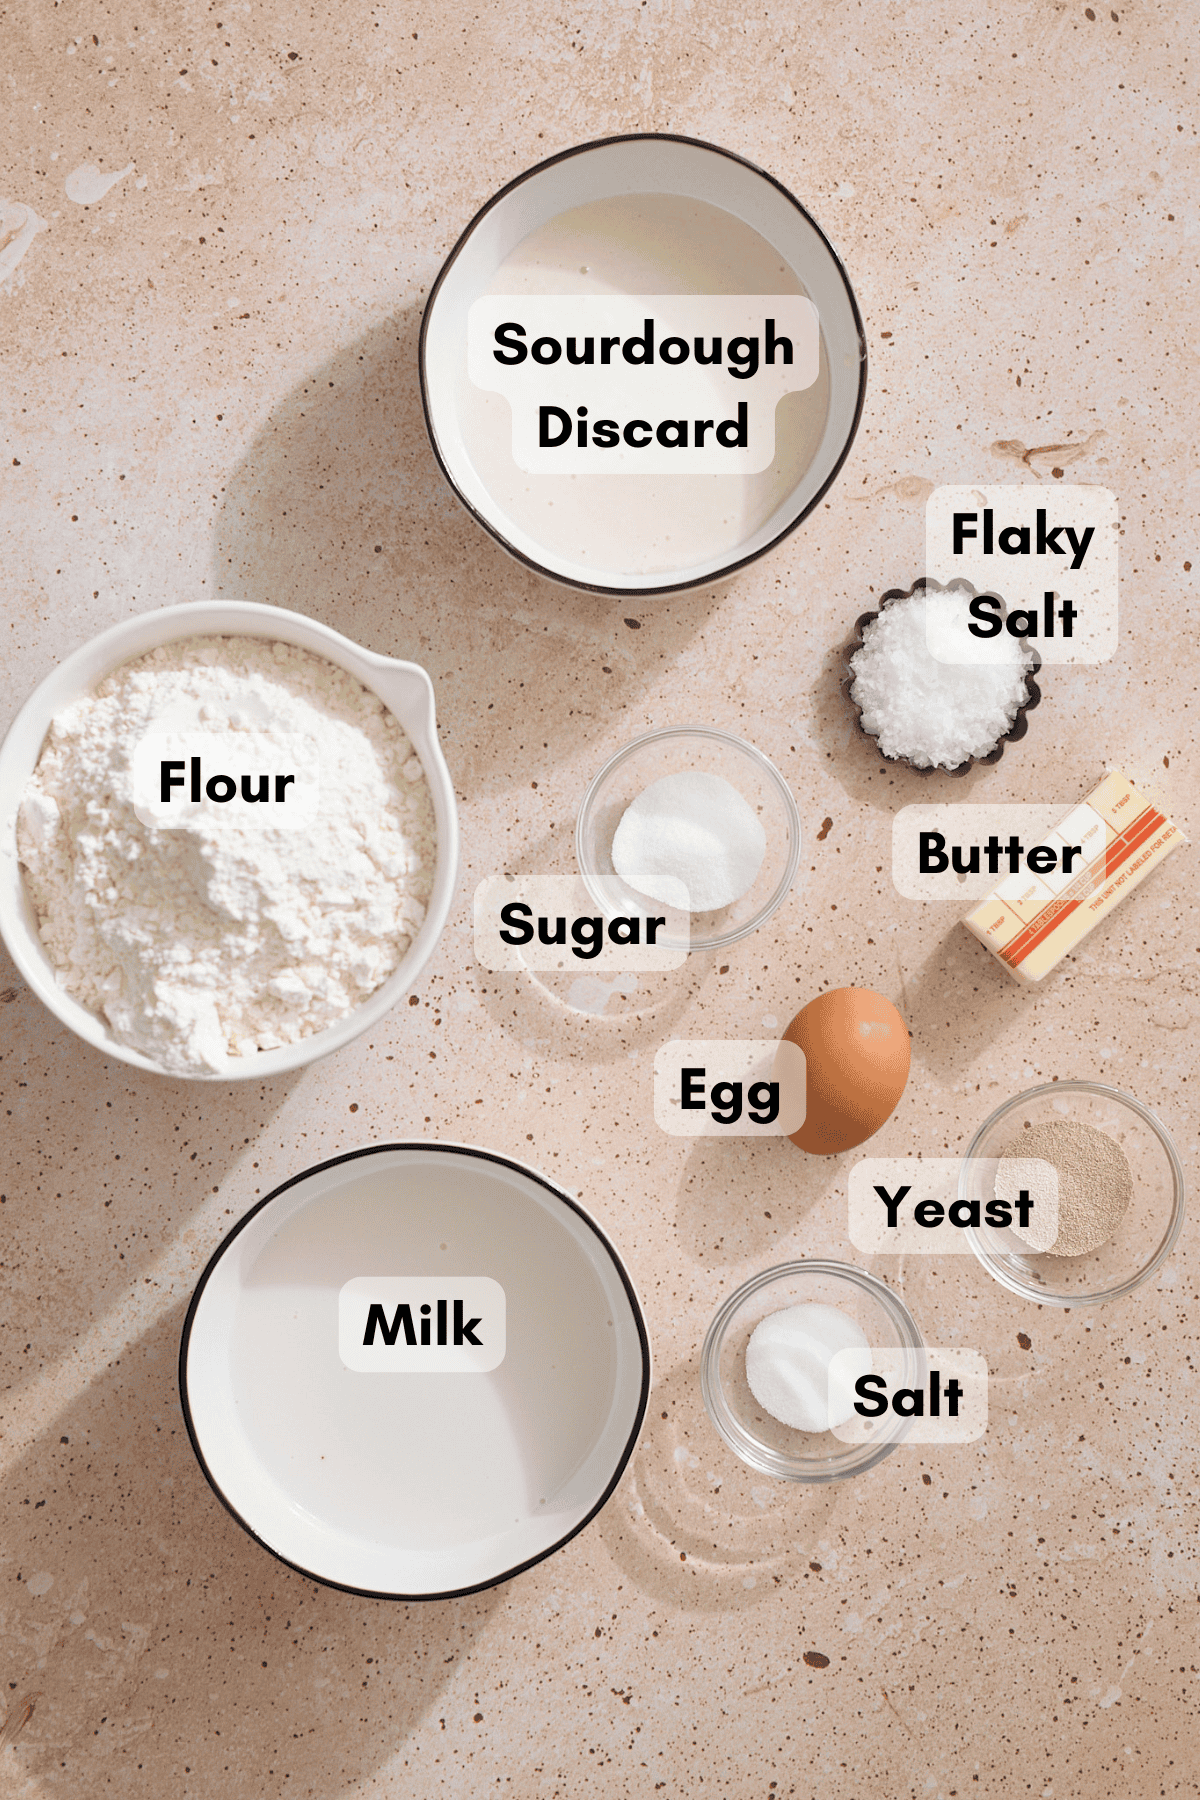
- Sourdough discard: You'll want the discard to be unfed and at room temperature for this recipe. This recipe is designed for a sourdough starter that uses a 1:1 ratio (when you feed the starter, it's with 1 part flour and 1 part water). If your sourdough starter uses a different ratio, you'll need to adjust some of the ingredients in this recipe.
- Learn more about how to make a sourdough starter.
- Flaky sea salt: This is optional, but I like to sprinkle some flaky sea salt (like Maldon Sea Salt) on the rolls before they bake.
See full recipe below for detailed directions.
Substitutions & Variations
This is a very adaptable recipe and I'd encourage you to make it your own! A few variations that I like to try include:
- Use active sourdough starter - If you'd like to use active sourdough starter, you can. To do so, omit the yeast and replace the sourdough discard with active starter (200g). You will also need to increase the rise times.
- Add toppings - After the second rise, brush the rolls with an egg wash (1 egg yolk mixed with 1 Tablespoon water), and sprinkle the rolls with poppy seeds, sesame seeds, or everything bagel seasoning. Bake as directed.
- Add herbs - Mix in chopped fresh herbs such as rosemary or parsley for a different flavor. Add 1-2 Tablespoons chopped fresh herbs when you are mixing the dough ingredients together.
- You might also love these Sourdough Discard Pumpkin Dinner Rolls.
- Try a potato roll - Try these Sourdough Discard Potato Dinner Rolls for a potato roll version of this recipe!
- Doing some Easter baking? Try these Sourdough Discard Hot Cross Buns, too!
How to Make Sourdough Discard Rolls
There are two rises to make these Sourdough Discard Rolls, so you'll need some patience, but the steps to make the recipe are very easy! The full recipe with detailed directions is at the bottom of this post.
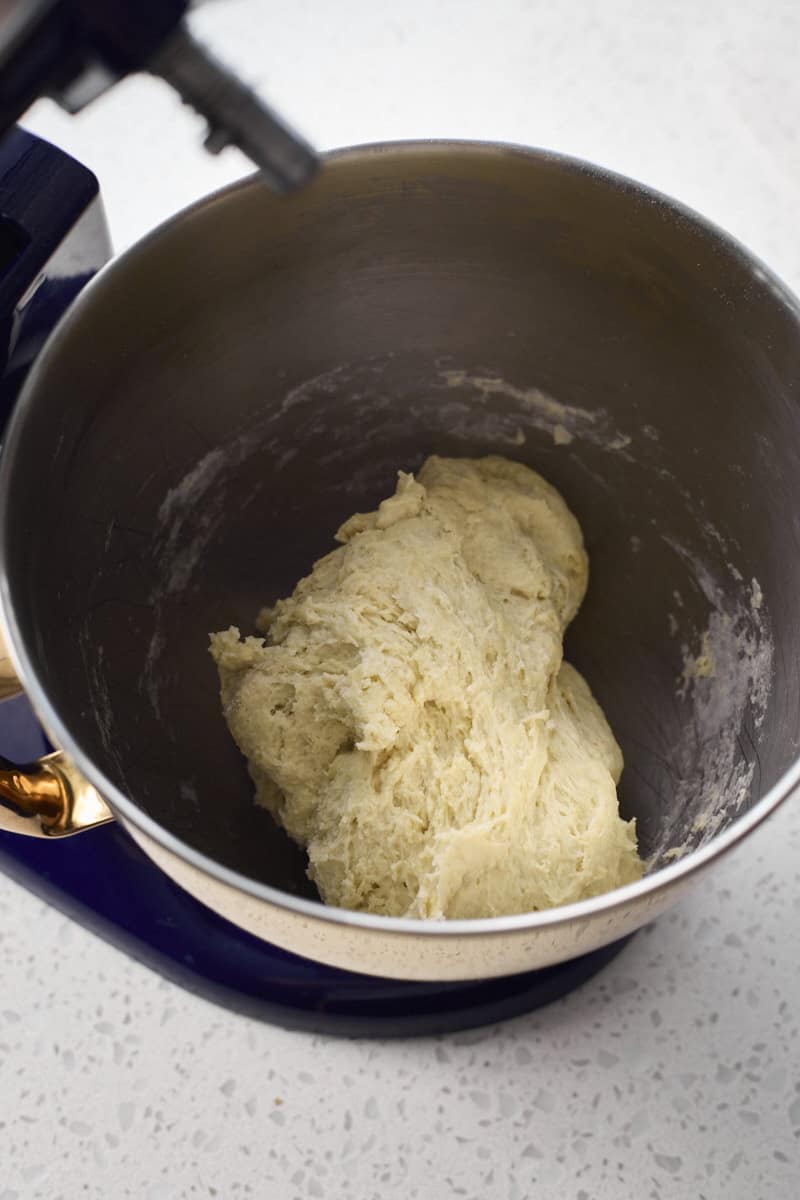
- Step 1: Combine all ingredients in the bowl of a stand mixer and mix until a rough dough forms.
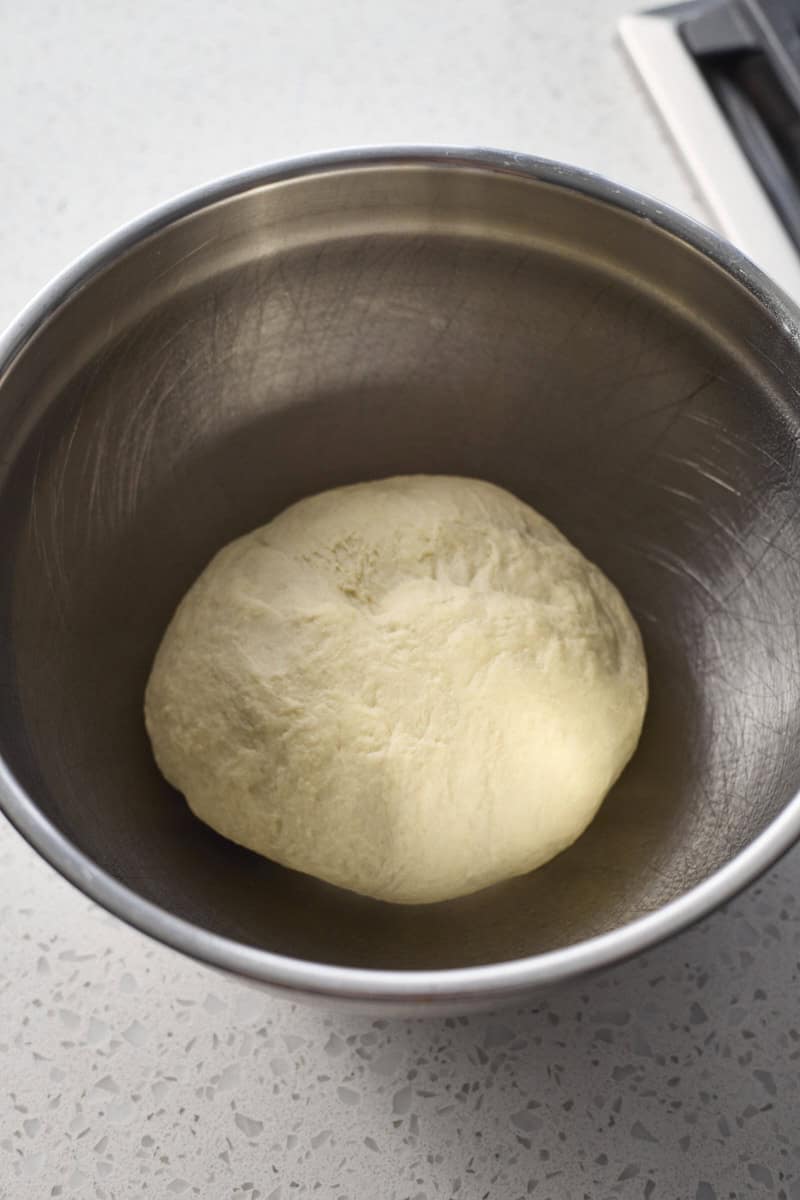
- Step 2: Transfer the dough to a smooth work surface and knead until a smooth dough forms, about 3-4 minutes. The dough should be soft, smooth and not sticky. Place the dough in a large, oiled bowl and let rise for 90 minutes.
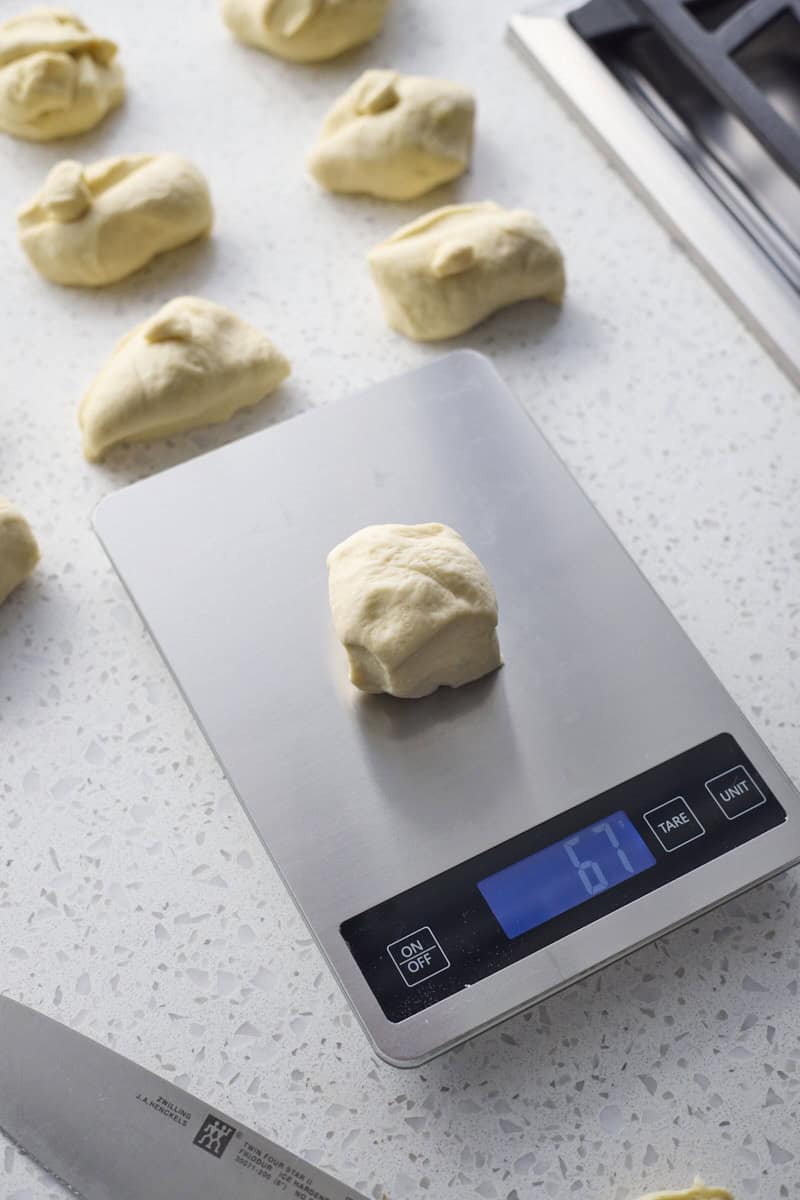
- Step 3: Divide the dough into 15 equal-sized pieces. I recommend using a kitchen scale here!
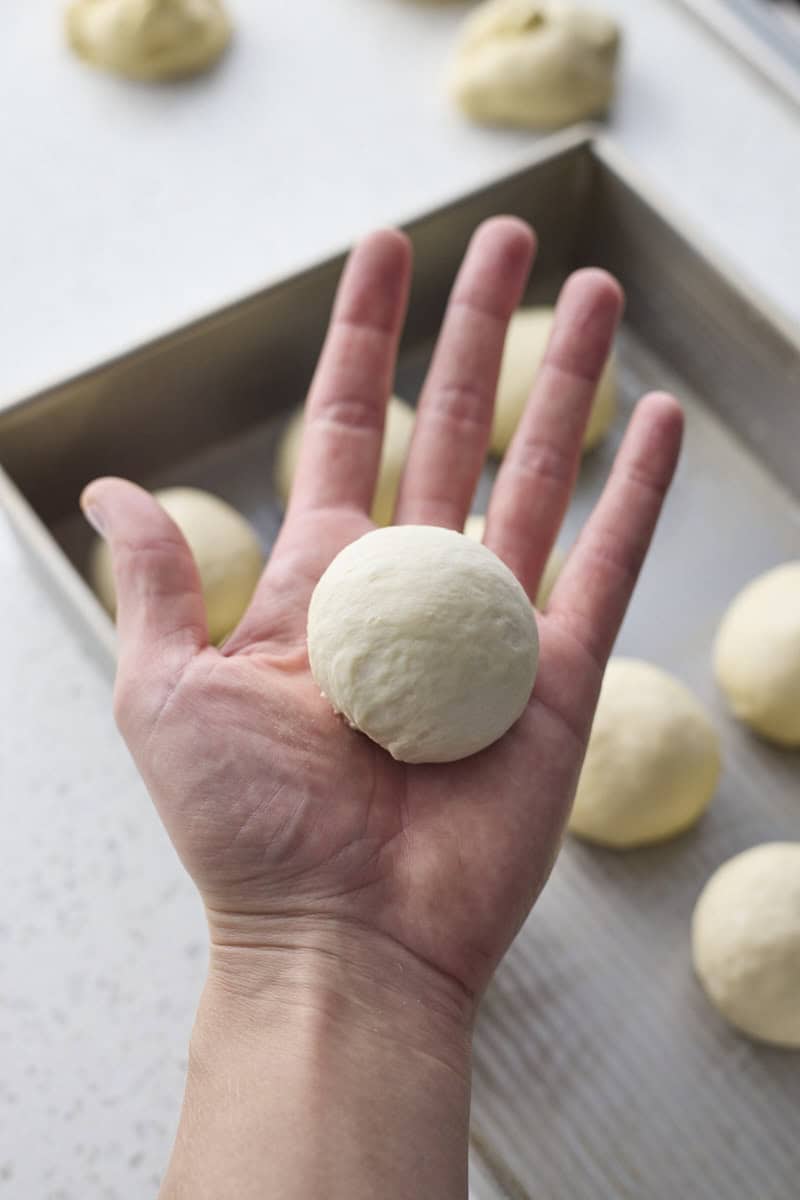
- Step 4: Using one palm for friction, roll the dough into a smooth ball with the seam side against your palm.
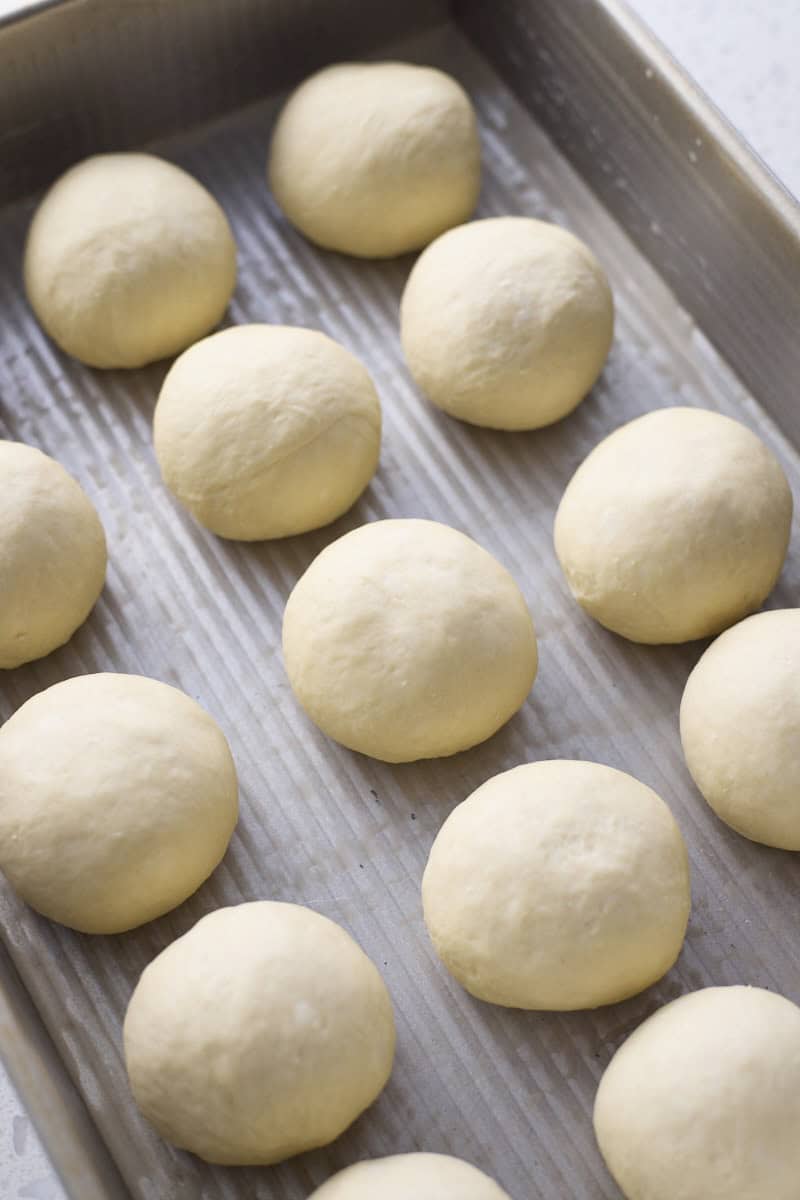
- Step 5: Place in the baking pan. Repeat until you have 15 rolls. Cover and let rise 1 hour.
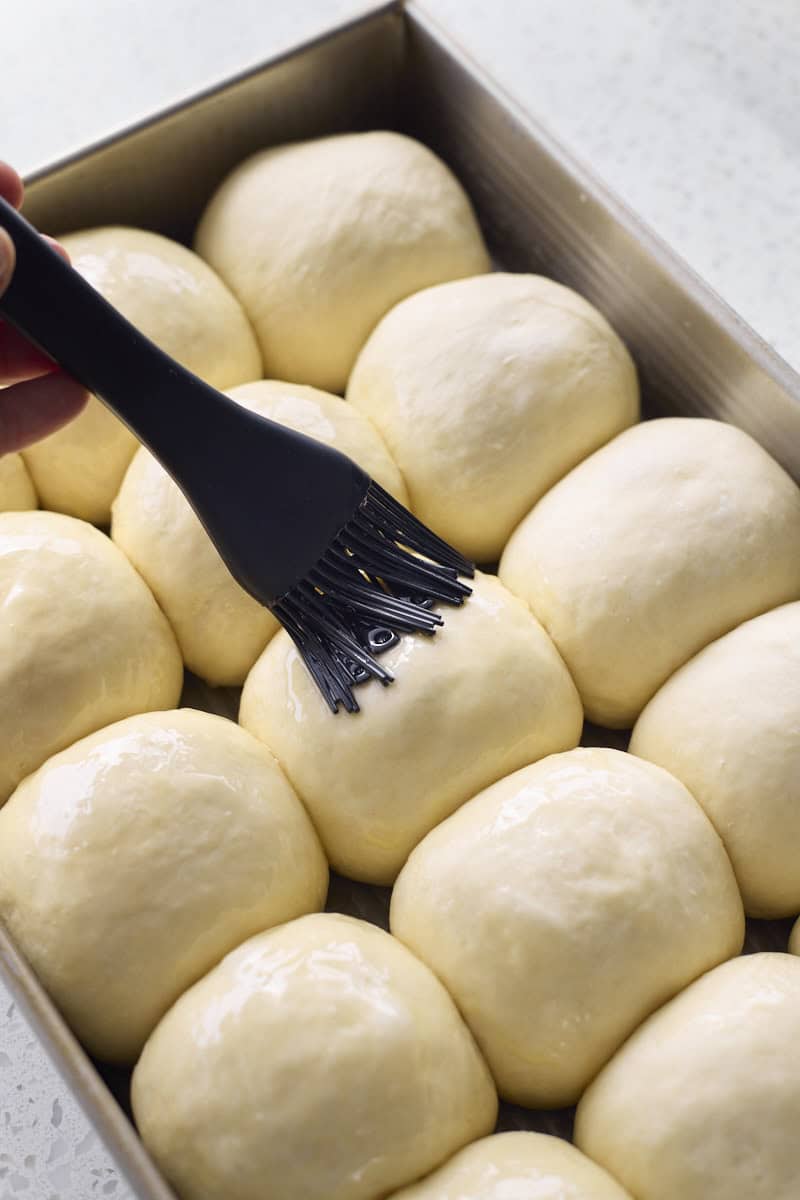
- Step 6: Brush the rolls with 2 Tablespoons of melted butter.

- Step 7: Sprinkle the rolls with flaky sea salt.
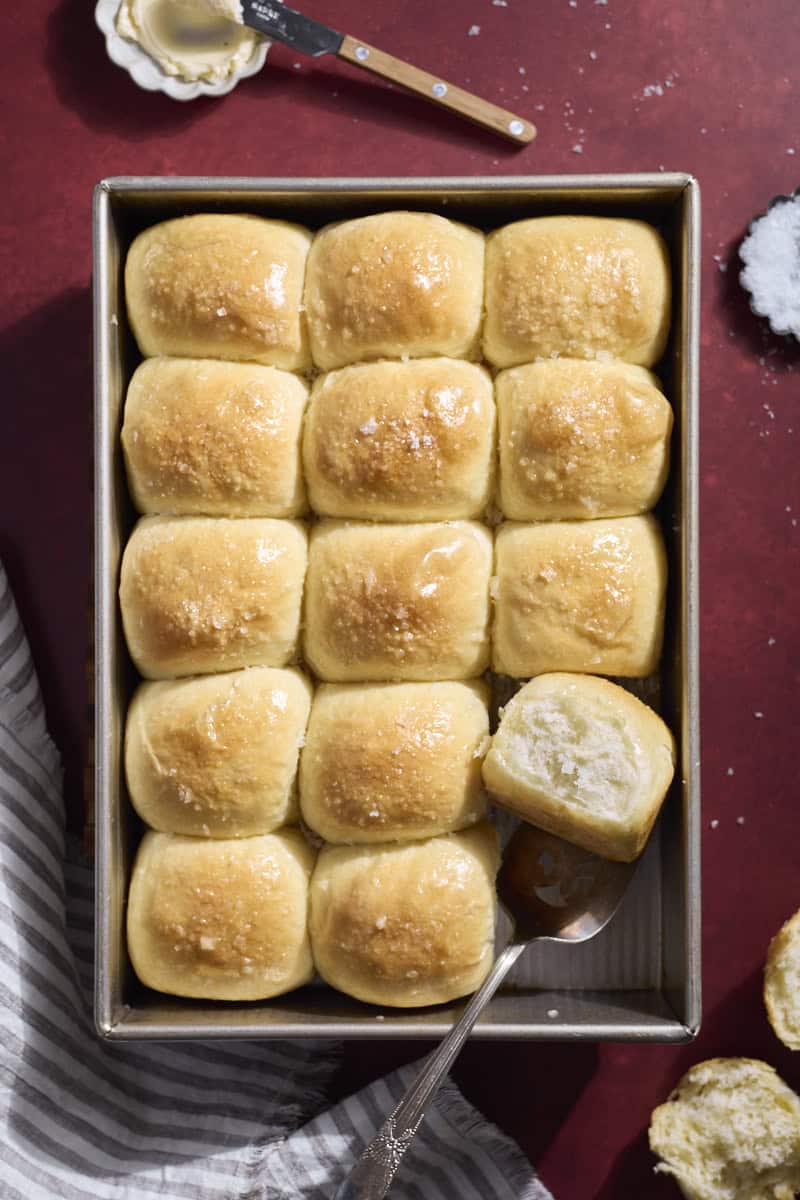
- Step 8: Bake until golden. Remove the rolls from the oven and brush again with melted butter (optional) before serving.
Expert Baking Tips
- Make sure to knead the dough long enough. The dough should be soft and smooth when you place it in the bowl for the first rise. The dough should not be sticky.
- Every sourdough discard is different. If you find the dough is too wet or too dry as you're kneading, add more flour or water (1 Tablespoon at a time) to reach your desired consistency.
- Use a kitchen scale to divide your dough. This will help ensure you have 15 equal-sized pieces. For me, each roll was about 67g each.
- The rise time will vary depending on the temperature of your room. If your room is cooler, you may need to let the dough rise longer. If your room is warmer, you may not need as much time. Keep an eye on your dough and have patience!
- Brushing the rolls with melted butter adds wonderful flavor - don't skip it!
- If you're looking for a few other sourdough discard recipes, check out these Sourdough Discard Cinnamon Rolls and these Sourdough Discard Pretzel Bites.
Can you pre-make dinner rolls ahead of time?
I've done a few freezer tests, and I find that freezing-then-baking doesn't work well. The best option: make the rolls fresh. But, if that isn't an option for you, and you know you're baking to freeze them, this is what I recommend:
- Bake: Bake the rolls completely, but omit the flaky sea salt on top of the rolls (you'll add this later when you reheat).
- Freeze: Once the rolls have cooled, transfer them to an airtight bag or container and freeze (for up to 3 months).
- Reheat: When you're ready to serve the rolls, let them thaw at room temperature (can take 1-3 hours). Then brush the rolls with melted butter, sprinkle with flaky sea salt, and reheat the rolls in the oven at 350 degrees F for 10 minutes.
They will taste almost as good as fresh-baked rolls!
Storage
Room Temperature Storage: If you plan to eat these rolls within 1-2 days, store them in an airtight container at room temperature. You can reheat them in the microwave for 30 seconds to make them warm and soft again.
Freezer Storage: Once the rolls have cooled fully, transfer them to an airtight container or freezer-safe bag and freeze for up to 3 months. You can freeze individual rolls, or the full tray of rolls.
- To reheat individual rolls: Reheat individual rolls in the microwave for 30-60 seconds (no need to let them thaw).
- To reheat the whole tray of rolls: Let the rolls thaw at room temperature. Brush the rolls with melted butter, sprinkle with flaky sea salt, then reheat in the oven at 350 degrees F for 10 minutes.
Recipe FAQs
Yes! To do so, omit the yeast and replace the sourdough discard with active sourdough starter (200g). You'll also need to increase the rise times.
Sourdough discard is inactive, so you need to use a leavening agent (in this case, yeast) to ensure the dough rises predictably. If you don't want to use commercial yeast, you can make this recipe with active sourdough starter instead of discard.
Yes! These rolls would be perfect buns for sliders or small sandwiches. You could also divide the dough into fewer pieces to make larger buns or rolls.
If you're looking for a few other fun dinner ideas, try this Sourdough Discard Pizza Dough or these Sourdough Discard Tortillas!
Yes! There is a section above with notes on how to make and freeze these rolls ahead of time (perfect for the holidays). I highly recommend baking fully, freezing, then reheating when you're ready to serve.
More Sourdough Discard Rolls


If you tried these Sourdough Discard Rolls or any other recipe on my website, please leave a ⭐ star rating and let me know how it went in the comments below. I'd love to hear from you! Happy Baking!

Sourdough Discard Rolls
Ingredients
- ¾ cup + 1 teaspoon milk (non-dairy or regular dairy) warmed to 110℉
- 1 ½ teaspoons instant yeast
- 2 teaspoons granulated sugar
- 3 ½ cups + 1 Tablespoon all-purpose flour
- 200 grams (about ¾ cup) sourdough discard unfed, at room temperature
- 1 egg lightly beaten
- 1 teaspoon kosher salt
- 5 Tablespoons unsalted butter melted and divided
- flaky sea salt for topping
Instructions
- Combine the warmed milk, instant yeast and sugar in the bowl of a stand mixer fitted with a dough hook*. Add the flour, sourdough discard, beaten egg and salt. With the mixer on low, slowly pour in 2 Tablespoons of melted butter. Increase speed to medium and mix until a rough dough forms, about 2 minutes.
- Transfer the dough to a smooth work surface and knead until smooth, about 3-4 minutes. The dough should be smooth, soft and not sticky. If needed, add more flour or milk (1 Tablespoon at a time) to reach your desired consistency.
- Transfer the dough to a large oiled bowl and cover with plastic wrap. Let rise for 90 minutes, or until doubled in size.
- Brush a 9x13-inch baking pan with 1 Tablespoon melted butter and set aside.**
- Turn the dough onto a smooth work surface and divide into 15 equal-sized pieces. This doesn't have to be exact, but if you do want perfectly identical rolls, weigh the dough on a kitchen scale and divide that number by 15. For me, each roll weighs about 67 grams. Roll each piece of dough into a ball in the palm of your hand, then place the rolls into the prepared baking dish. Repeat until you have 15 rolls.
- Cover the baking dish with plastic wrap and let the rolls rise for 60 minutes, until puffed and doubled in size.
- Preheat the oven to 375℉. Brush the rolls with 2 Tablespoons melted butter, then sprinkle with flaky sea salt. Bake for 25-28 minutes until golden brown. If desired, brush with additional melted butter before serving.
Taelynn Hale says
Could I use an egg wash to make them a little darker?
Jessica Vogl says
You could do that!
Kaela says
I wanted to like these. A recipe should just be written as to be followed without having to make tweaks. Still edible.