

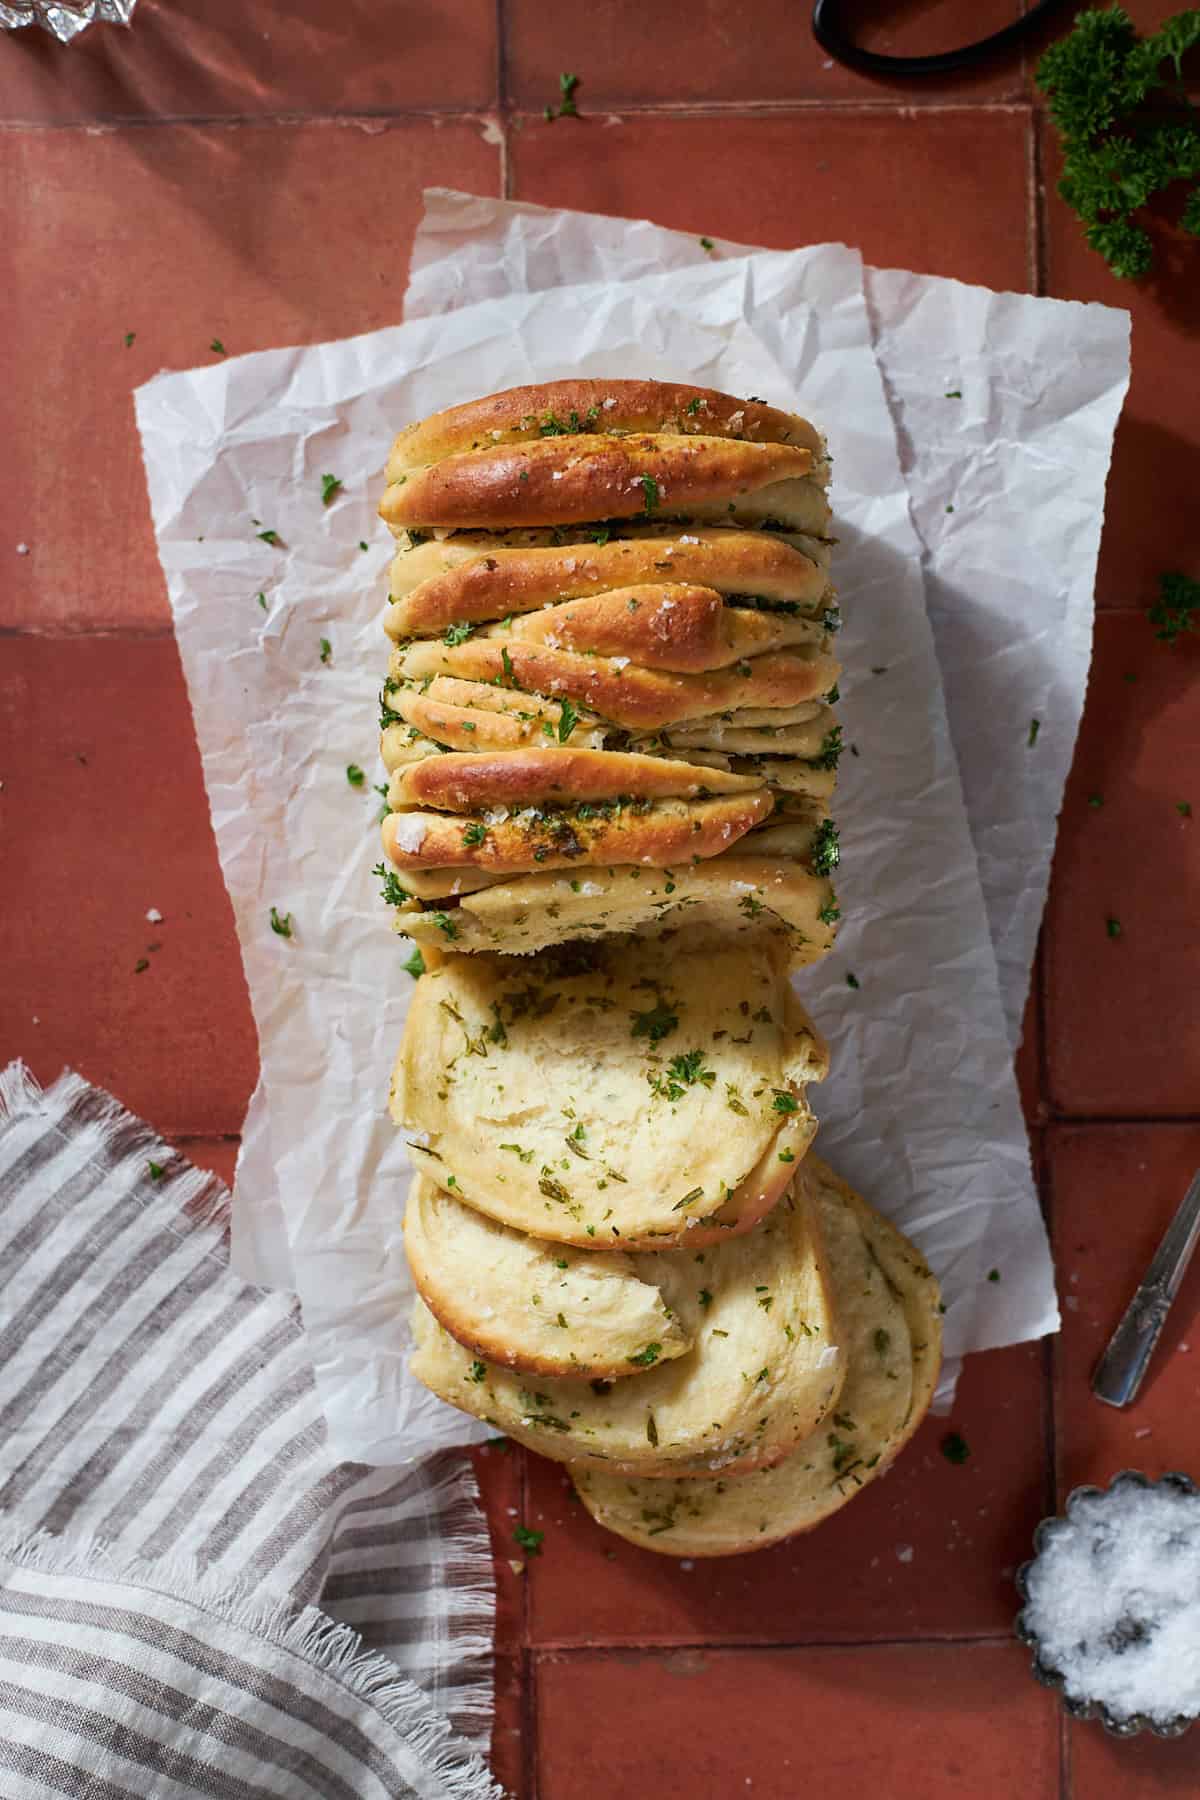
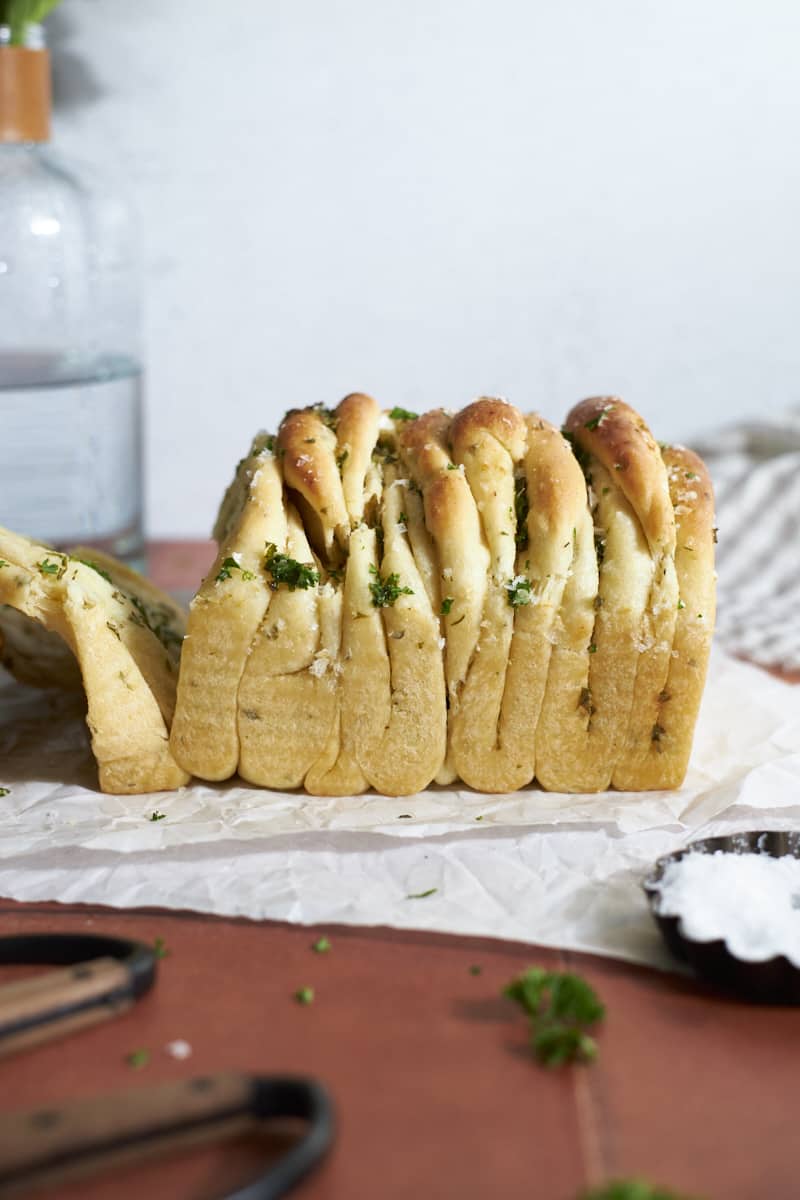
This Sourdough Discard Garlic Pull Apart Bread is delicious and fun to eat (and make!). Peel off a buttery, garlicky layer to enjoy on its own, as an appetizer, or as a side dish with a meal. It's a fun twist on classic garlic bread that you can make with sourdough discard or active sourdough starter, if you prefer!
If you're really in the mood for a sweet pull-apart bread, try my Sourdough Discard Cinnamon Roll Pull Apart Bread and my Sourdough Discard Apple Pull Apart Bread!
This was so good and fun to make - came out perfect. Thank you for the recipe!
- Mary
Why you'll love this recipe
- The irregularity is part of the charm of this recipe, so you don't need to worry about dividing the dough perfectly, or shaping the pieces into perfect shapes!
- It also makes this a great recipe to make with young or inexperienced bread bakers - it's very forgiving!
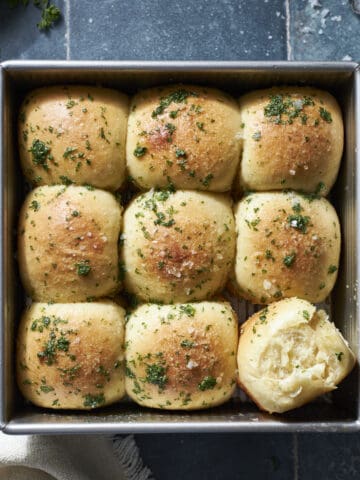
- The garlic bread layers are buttery, garlicky, and delicious - and very fun to peel and eat! And if you're in a garlic mood, try these Sourdough Discard Garlic Rolls!
- This recipe is best served warm, while the layers are still soft and fragrant.
- You can easily modify this recipe to use active sourdough starter instead of sourdough discard, if you prefer.
- You can change up the herbs to suit your tastes. Only rosemary? Only parsley? A mix? Something else entirely? Go for it!
- Looking for other side dishes or appetizer recipes? Try these Sourdough Discard Potato Dinner Rolls and these Sourdough Discard Miniature Pizzas.
Jump to:
Ingredients
There are only a few key ingredients you'll need to make this pull-apart bread.
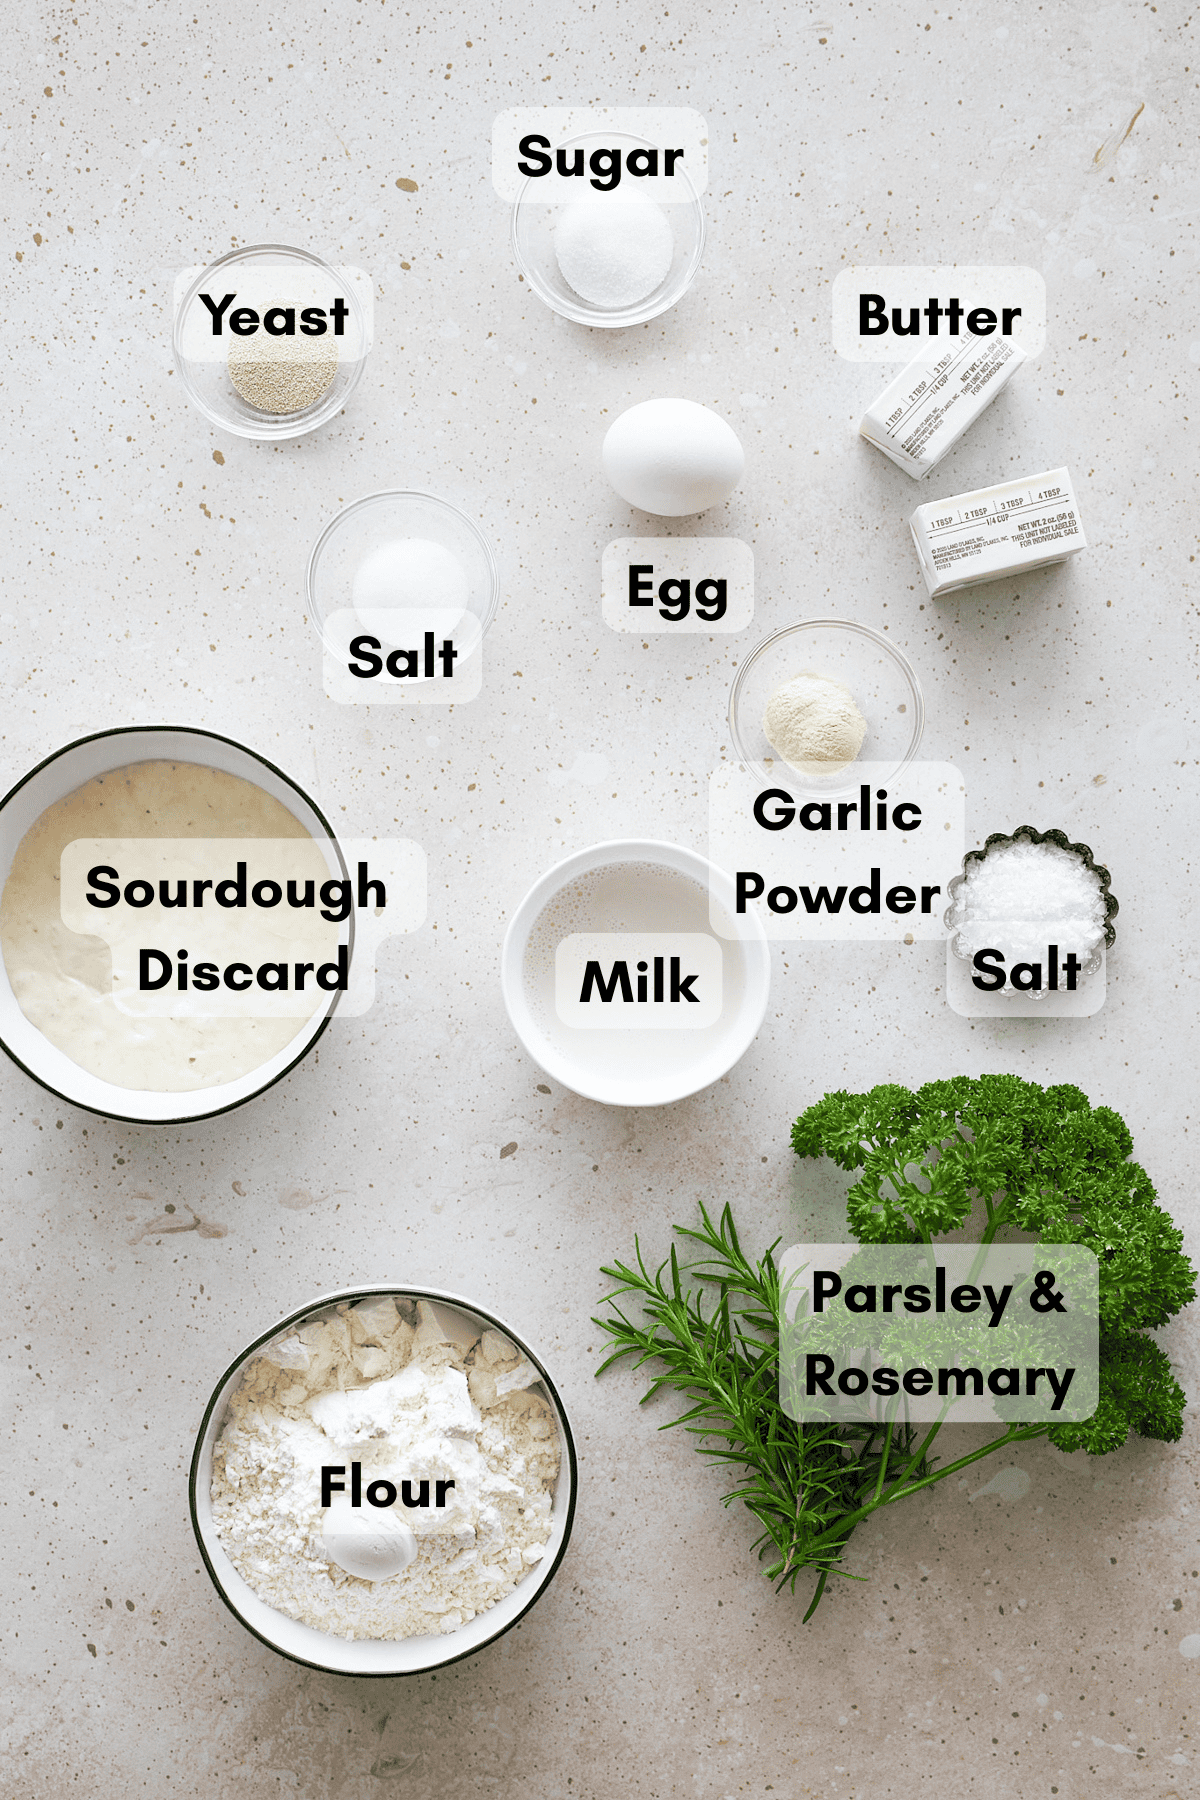
- Sourdough discard: The sourdough discard should be unfed and at room temperature for this recipe. This recipe is designed for a sourdough starter with a 1:1 ratio (when you feed your starter, it's with 1 part water and 1 part flour). If your starter uses a different ratio, you may need to adjust some of the ingredients in this recipe.
- Learn more about how to make a sourdough starter.
- Garlic powder: Make sure you're using garlic powder and not garlic salt! This helps give that great garlicky taste.
- Fresh parsley or rosemary: You can use either fresh parsley or rosemary (or a combination of both!) for this recipe. I highly recommend using fresh rather than dried herbs.
- If you're in a rosemary mood, try these Sourdough Discard Rosemary Salt Bagels and this Sourdough Discard Tomato Focaccia!
- Flaky sea salt: Finishing the bread with flaky sea salt gives it a perfect flavor kick. I like to use Maldon Sea Salt.
See full recipe below for detailed directions.
Substitutions & Variations
This is a very adaptable recipe and below are a few easy substitutions and variations you can try.
- Use active sourdough starter - If you'd like to make this recipe with active sourdough starter instead of discard, you can. To do so, omit the yeast, and replace the sourdough discard with active starter (200g). You'll also need to adjust the rise times.
- Use different herbs - You can use either parsley or rosemary for this recipe (or a combination of both!). If you like, you can also mix up the herbs and use something else - sage would be wonderful here!
- Add cheese - If you're interested, you can sprinkle ¼ cup of shredded parmesan cheese in between the dough layers as you're building the bread. Spread each piece with the butter mixture, then sprinkle with cheese and fold as directed.
- Use fresh garlic - If you'd like to use fresh garlic instead of garlic powder, you can! One clove of garlic is equal to ¼ teaspoon of garlic powder.
- Looking for a different garlic bread option? Try these Sourdough Discard Garlic Knots!
How to Make Sourdough Discard Garlic Pull Apart Bread
There are just a few steps and the most involved part (but also the most fun part!) is the assembly. The full recipe with detailed directions is at the bottom of this post.
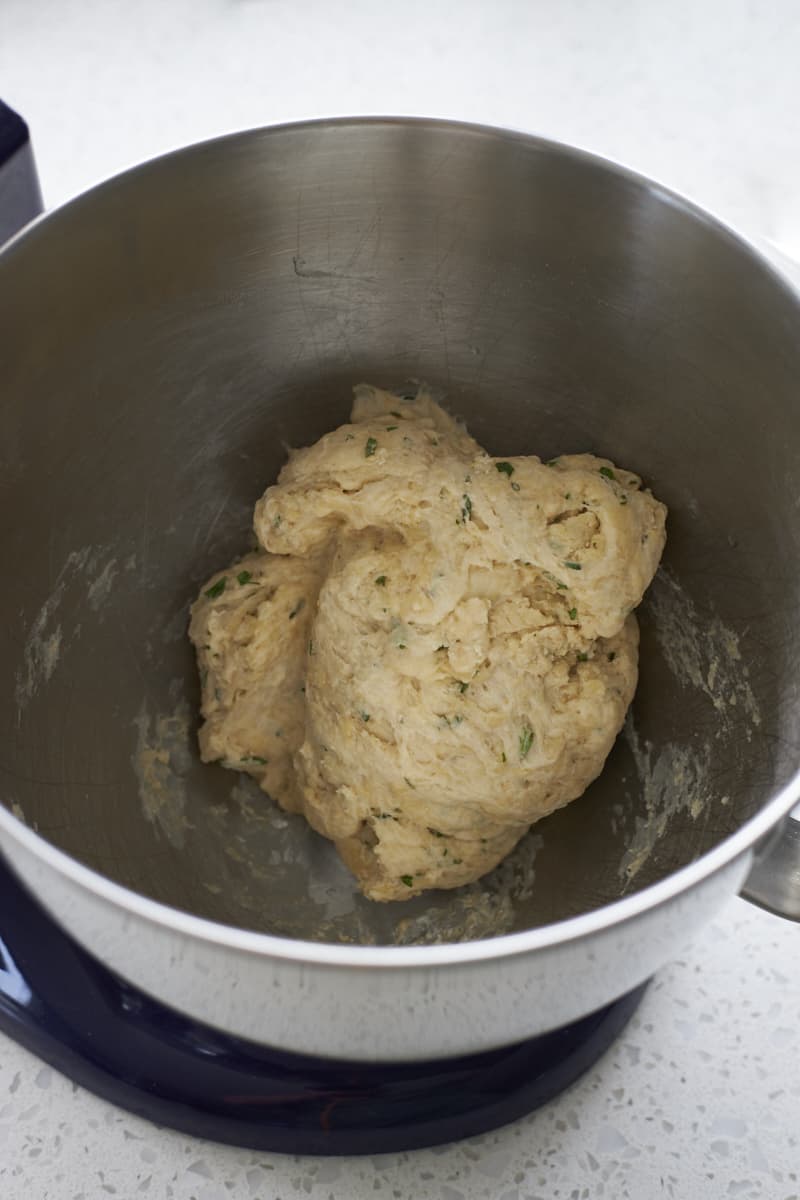
- Step 1: Combine all ingredients except butter in the bowl of a stand mixer. With the mixer on low, slowly pour in the melted butter until a shaggy dough forms.
- Step 2: Knead the dough on a work surface for 3-4 minutes until smooth. The dough should be soft, smooth, and not sticky. If needed, add more flour or milk (1 Tablespoon at a time) to reach your desired consistency.
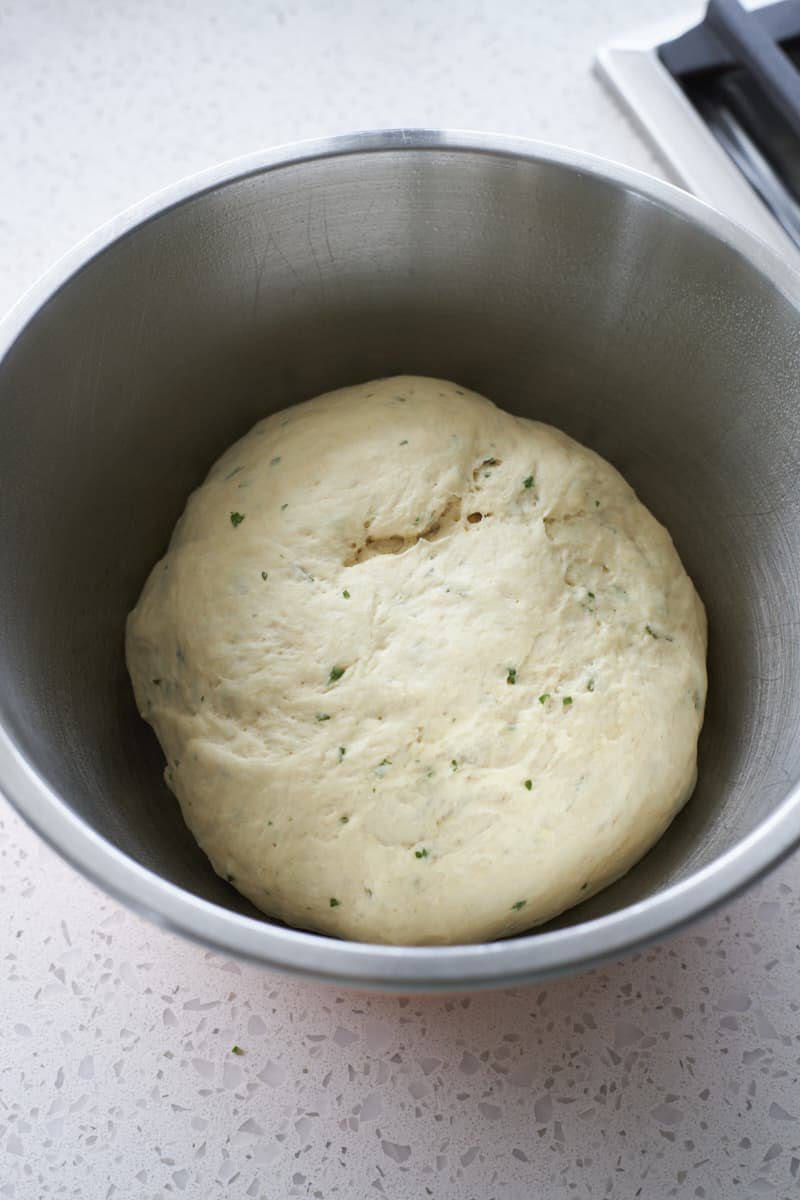
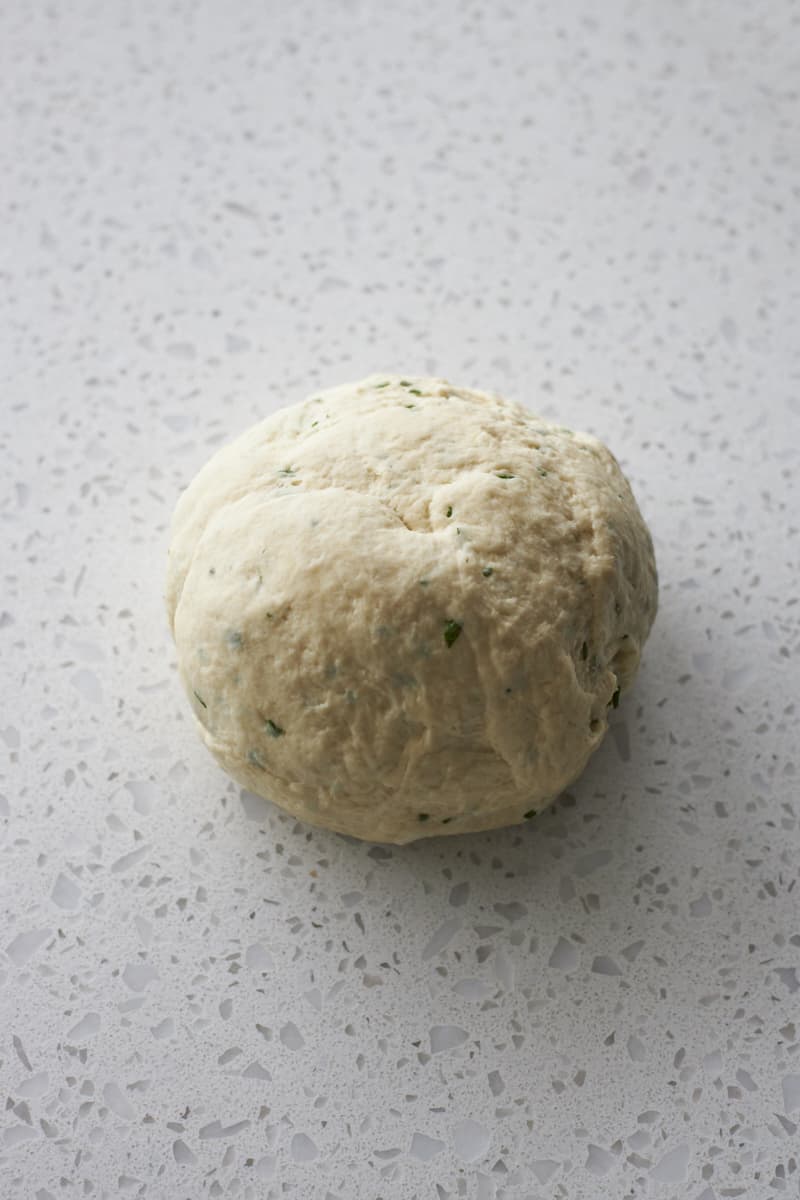
- Step 3: Transfer the dough to a large, oiled bowl. Cover with plastic wrap and let rise for 60-90 minutes until doubled in size.
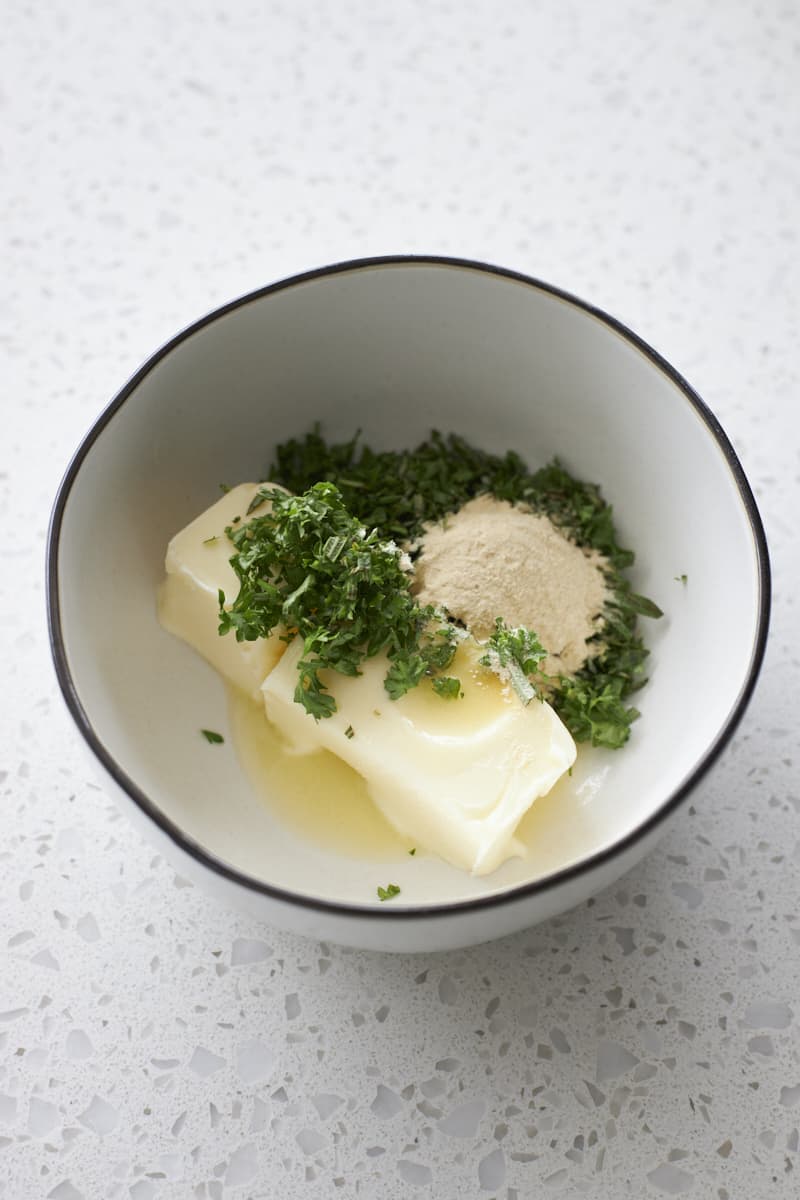
- Step 4: In a small bowl, mix together the softened butter, chopped herbs, garlic powder and salt for the topping. Make sure the butter is very soft to make for easier mixing.
- Step 5: Transfer the dough to a work surface and divide into 12 equal-sized pieces. I recommend using a kitchen scale to measure perfectly even pieces.
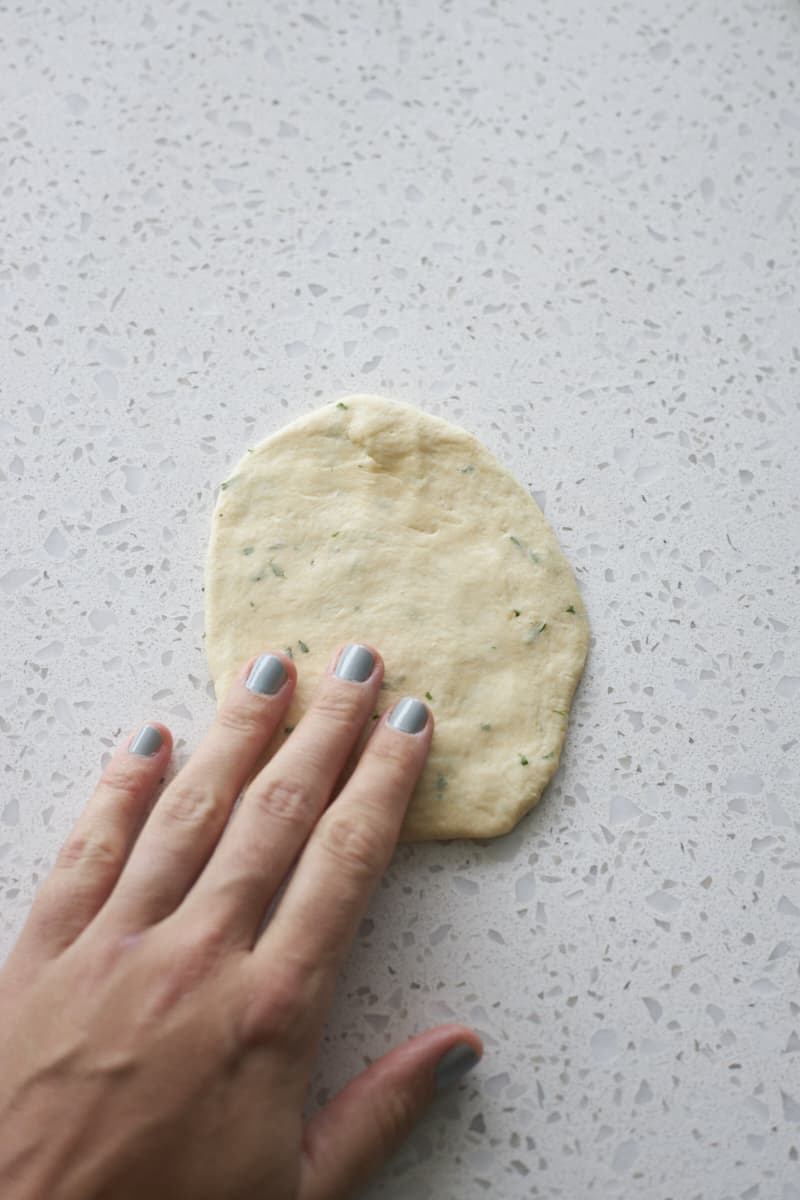
- Step 6: Press and flatten the dough with your hand (you can use a rolling pin if you prefer) into an oval about 4 inches wide (this is the about the width of your pan). This doesn't need to be exact; the irregularity is part of this recipe!
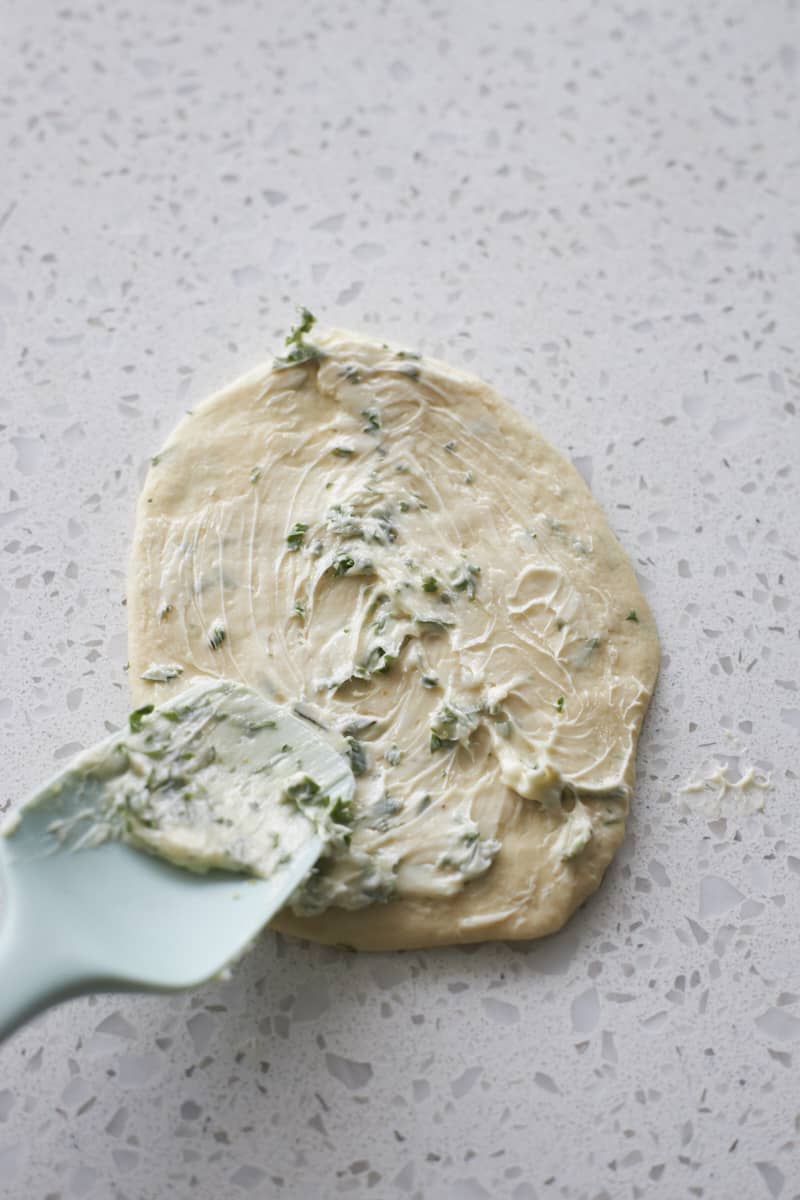
- Step 7: Generously spread each flattened piece with the butter mixture. You'll use about 1-2 teaspoons of the butter mixture on each piece.
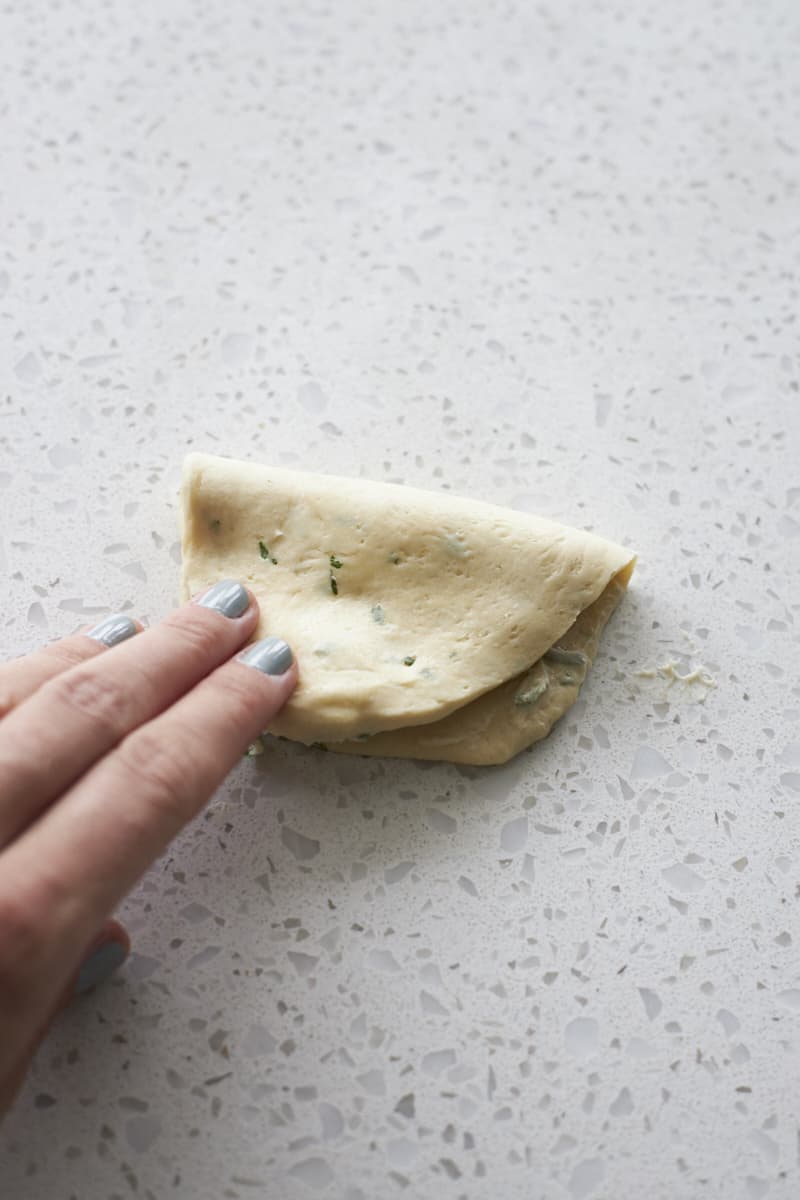
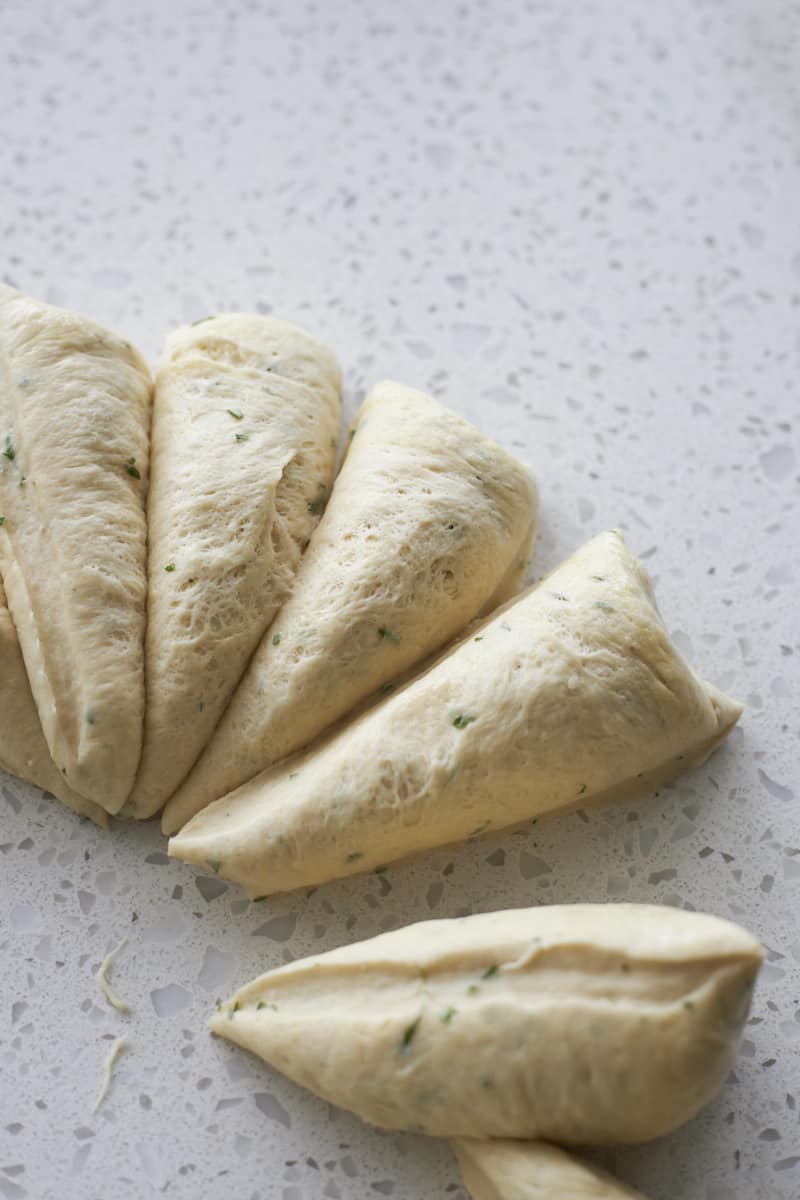
- Step 8: Fold the buttered piece in half like a taco.
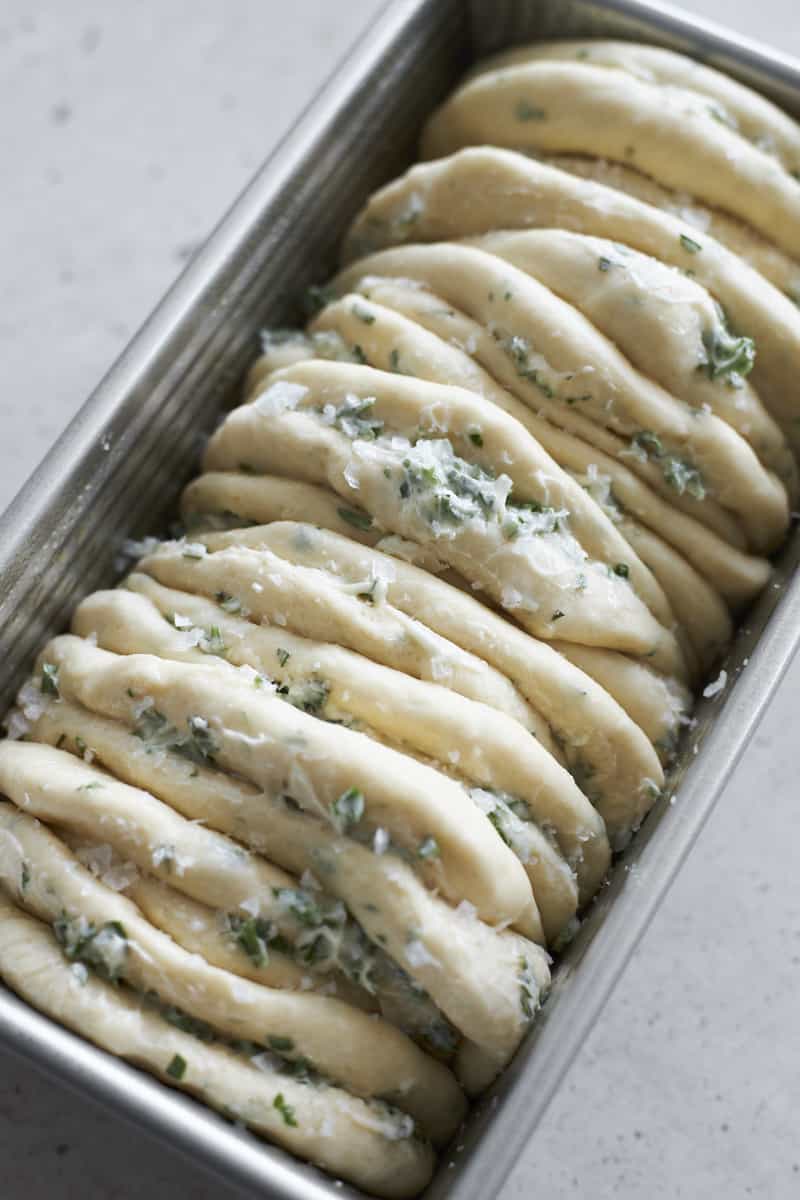
- Step 9: Place the piece fold-side-down in a greased 9x5-inch loaf pan. Repeat with the remaining pieces until the bread pan is full.
- Step 10: Cover with plastic wrap and let rise 30-45 minutes until puffed. The dough should not rise above the top of the bread pan.
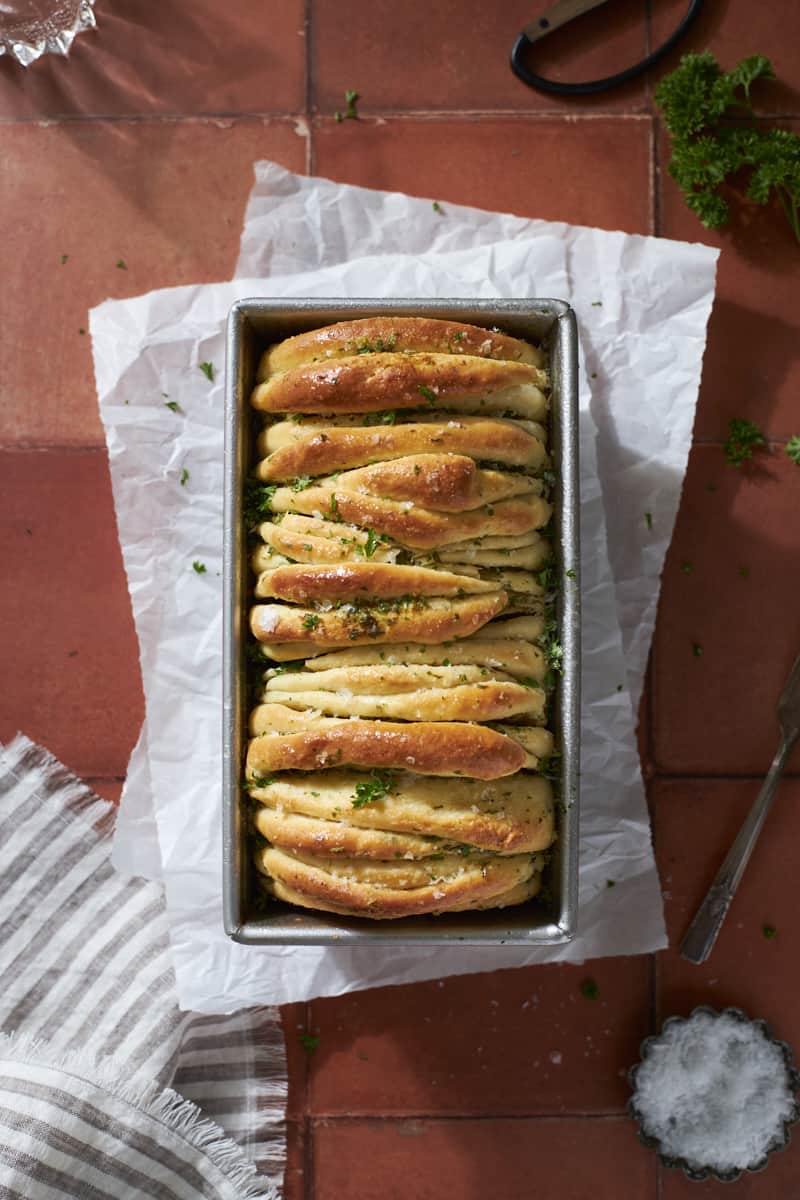
- Step 11: Bake until golden brown and the internal temperature reaches 200℉ on a kitchen thermometer. While warm, brush with any remaining butter mixture and sprinkle with flaky sea salt. Let cool slightly, then serve while still warm.
Expert Baking Tips
- Make sure to knead the dough long enough. The dough should be smooth and not sticky. If needed, add more flour or non-dairy milk (1 Tablespoon / 10 grams at a time) to reach your desired consistency.
- Shaping the dough does not have to be perfect. Part of the fun of this recipe (and others like my Sourdough Discard Pretzel Bites) is the irregularity of the garlic bread layers. Embrace it and shape the dough pieces by hand, let them be irregular shapes, and don't worry about them being the same size.
- Be generous with the butter mixture on each piece of dough. You'll also want to keep a little bit of the butter mixture to brush on the warm bread when it comes out of the oven!
- Do not let the dough rise past the top of the bread pan during the second rise. If it does, it will still be delicious, but you'll run the risk of the dough folding and falling over the edge of the pan as it bakes.
- Use a kitchen thermometer to make sure the loaf is fully baked. When finished, the loaf will reach an internal temperature of 200℉.
- Try a sweet version of this recipe with this Sourdough Discard Pumpkin Pull Apart Bread.
Storage
Room Temperature Storage: This Sourdough Discard Garlic Pull Apart Bread is best eaten fresh, while it's still slightly warm. You can store the bread in a sealed plastic bag or airtight container for up to 3 days. If needed, reheat in the microwave for about 30 seconds to make the bread soft and warm again.
Freezer Storage: If you want to store this bread to enjoy later, let it cool fully, then transfer to an airtight, freezer-safe container or bag. Freeze for up to 3 months. To reheat, let the bread thaw in the refrigerator overnight, then warm in the microwave for 30-60 seconds. You can also reheat the full loaf in the oven at 350 degrees F for about 10 minutes.
Recipe FAQs
I highly recommend using fresh herbs, but if you're in a pinch, dried herbs will work, too. Use 1 teaspoon of dried herbs in place of 1 Tablespoon of fresh herbs. And if you prefer using dried herbs, check out these Sourdough Discard Breadsticks, too!
There are times and visual cues listed in the recipe below, but the foolproof way is to measure the internal temperature of the loaf with a kitchen thermometer. When it's fully baked, the loaf will reach an internal temperature of 200℉.
More Sourdough Discard Appetizer Recipes


If you tried this Sourdough Discard Garlic Pull Apart Bread or any other recipe on my website, please leave a star rating and let me know how it went in the comments below. I'd love to hear from you! Happy Baking!

Sourdough Discard Garlic Pull Apart Bread
Equipment
- Kitchen thermometer optional
Ingredients
For the bread
- ¼ cup non-dairy or regular dairy milk warmed to 110℉
- 1 ½ teaspoons instant yeast
- 2 teaspoons granulated sugar
- 2 cups + 1 Tablespoon all-purpose flour
- 200 grams (about ¾ cup) sourdough discard unfed, at room temperature
- 1 egg lightly beaten
- 1 Tablespoon fresh parsley or rosemary chopped
- 1 teaspoon kosher salt
- 1 teaspoon garlic powder
- 2 Tablespoons unsalted butter melted
For the topping
- 7 Tablespoons unsalted butter softened
- 1 Tablespoon fresh parsley or rosemary chopped
- 1 Tablespoon garlic powder
- ½ teaspoon kosher salt
- flaky sea salt for topping
Instructions
- Combine the warmed milk, instant yeast, and sugar in the bowl of a stand mixer fitted with a dough hook*. Add the flour, sourdough discard, beaten egg, chopped herbs, salt, and garlic powder. With the mixer on low speed, slowly add 2 Tablespoons of melted butter. Increase speed to medium and mix until a shaggy dough forms.
- Transfer the dough to a smooth work surface and knead until a smooth dough forms, about 3-4 minutes. The dough should be smooth and slightly tacky (but not sticky). If needed, add more flour or milk (1 Tablespoon / 10 grams at a time) to reach your desired consistency.
- Transfer the dough to a large greased bowl and cover with plastic wrap. Let rise for 60-90 minutes, or until doubled in size.
- While the dough rises, make the topping. In a small bowl, combine the softened butter, chopped herbs, garlic powder, and ½ teaspoon salt. Mix until combined. Set aside 1 Tablespoon of this mixture to brush on the loaf when it comes out of the oven. Grease a 9x5-inch loaf pan and set aside**.
- After the rise, turn the dough onto a smooth work surface and divide into 12 equal-sized pieces. I recommend using a kitchen scale to divide the dough evenly (for me, each piece was about 55 grams).Flatten each piece with the palm of your hand into a rough circle about 4 inches in diameter, then spread with 1-2 teaspoons of the butter mixture. Fold the piece in half like a taco, then transfer to the prepared baking pan with the fold-side down on the bottom of the pan. Repeat with the remaining pieces of dough, using all but the 1 Tablespoon of the butter mixture you've kept for brushing on the loaf when it comes out of the oven.
- Cover the pan with plastic wrap or a clean kitchen towel and let rise 30-45 minutes until the dough is puffed. The dough should not rise above the edges of the loaf pan.
- Preheat the oven to 350℉ (175℃).
- Bake for 30 minutes, then cover with aluminum foil and bake an additional 5-10 minutes. The final loaf will be golden brown, and if you use a kitchen thermometer, the internal temperature will reach about 200℉ (95℃). While the loaf is still warm, brush with the remaining butter mixture and sprinkle with flaky sea salt. Let the loaf cool in the pan for 10 minutes, then serve.
Cherie says
What is your preferred non-dairy butter? I’m excited to share this with my family!
Jessica Vogl says
I typically use regular butter for baking (there is very little lactose in butter, which I find works for me, but I realize that doesn’t work for everyone!). I will use Miyokos or Earth Balance on occasion!
Ashlie Celis says
I have made this like 6 times in the last month and a half. ITS AWSOME!! I don't use the yeast and instead use fed starter, it takes about 6 hours to rise and about 1 hour for my second rise. I always double it because my family adores it!! Thank you for sharing!!!
Hilary says
Did you reduce the fed starter? 200g of active starter seemed high so I cut it down to 100g and adjusted flour/milk accordingly. I'm letting it rise through the night so I hope it will be fine. I am making a double batch, too.
RaiAn says
I'm curious if you reduced the fed starter also.
Madelyn Nyarko says
This came out so good ,had to stop myself from eating it all and really easy to make
Kara says
I am in the final rise of this recipe and I am a rookie this is my first not made in the bread maker item, I have mastered the bread maker and the bread recipe but I am so excited for these. Seriously so easy to follow again I am a ROOKIE so to be able follow this recipe with success made me feel so good! I will update when I taste test but I couldn’t help myself to post. AWESOME recipe
Jessica Vogl says
So glad you love it! ❤️
Katherine Sullivan says
Can I make this the day before i want to serve it and refrigerate overnight? Thank you!
Jessica Vogl says
I’d recommend letting it do the second rise in the fridge overnight. When you’re ready the next day, let the dough come to room temperature, then bake before serving.
sarah says
How would you recommend making this ahead for Christmas dinner? Could I just prepare it and then refrigerate until ready to bake?
Eniko says
Can’t wait to try this. I don’t understand the reason for non-dairy milk. I assume using cows milk is ok?
Jessica Vogl says
I'm lactose-intolerant, so I use non-dairy milk in all my recipes. Yes, regular dairy milk will work just as well!
Alissa says
Can I use active starter and skip the yeast?
Jessica Vogl says
Yes! You can replace the discard with active starter and omit the yeast. You may need to adjust the rise times as well, so keep an eye on the dough.
Ashley says
Hi! Can I add cooked bacon and shredded cheese to this?
Jessica Vogl says
Yes! That sounds delicious!
Jo-Anne says
Great recipe - would be way faster if you could add ingredient amounts in grams please. Very finicky with the flour and butter
Brandy says
My garlic bread turned out really weird. It didn’t taste like garlic, it was quite chewy and it didn’t look done even thought I baked it for 20 minutes longer than the recipe called for. I’ve read somewhere that you shouldn’t mix garlic with sourdough, I’m honestly not sure if it’s true. I really wanted this recipe to work because it looks delicious.
Jessica Vogl says
Sorry to hear that! What size pan were you using?
Elizabeth Arnold says
Hello, I'm just curious about the rising of dough. When making other types of bread it's always required to do stretch and folds. I was wondering why it's not called for in this recipe?
Jessica Vogl says
Good question! To be honest it’s more like making rolls (no stretch and folds) than it is like making a loaf of bread. Hope that helps!
Christina B says
I have made this so many times since discovering this recipe! Thank you so much for sharing, my family asked me to make another loaf immediately after it was gone! I now make 2 at a time, that's how fast it goes in our house.
Kathy says
Why Non-dairy milk?
Jessica Vogl says
I'm lactose-intolerant, so all my recipes are written that way! But you can use regular dairy milk as well.
Christina says
Yum! I made this once and it was amazing! My question is could I put mozzarella in it? Have you tried that?
Jessica Vogl says
You definitely could! I’m lactose intolerant, so not something I have tried but I’ve seen many people add cheese to this recipe!
Robert G. says
Made this tonight. Tweaked it just a bit. Used four cloves of garlic we grew ourselves and Italian seasoning that we made. Extra butter on top when it came out of the oven. Absolute best garlic bread that my wife and I have ever tasted. Your recipes are quickly becoming our favorites! Thank you!
Mia Koob says
Could I do the second rise in the fridge? If so how long? I want to make it a few hours in advance for dinner so I can just throw it in the oven before dinner
Jessica Vogl says
If you’re wanting to make a few hours I advance, I would let it do most of the second rise at room temp, then fridge for however long you need. When you’re ready, take it out and let it come to room temp (or rise any extra needed), then bake.