

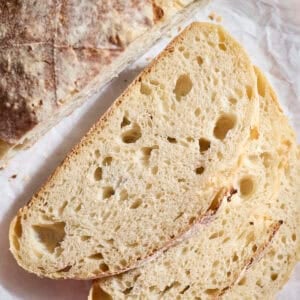
This Easy Sourdough Bread is a great way to step into the sourdough bread game. It's a same-day recipe, meaning you can feed your starter, make the dough, bulk ferment, shape, and bake all in the same day.
This recipe is meant to be very simple and great for beginner sourdough bakers, with minimal special equipment needed. It's also a great recipe to experiment with adding inclusions!
Not quite ready for a full sourdough loaf? Try my Easy Sourdough Discard Bread, too!
Why you'll love this recipe
- This is a same-day recipe, meaning you'll have a delicious loaf to cut into at the end of the day!
- This recipe uses active sourdough starter as the leavening agent and needs no added commercial yeast.
- There is minimal special equipment needed, and the techniques used are very simple, making it a great recipe for beginner sourdough bakers.
- Want to use up some of your sourdough discard to make a loaf, too? Try this Sourdough Discard Sandwich Bread and this Sourdough Discard Cinnamon Raisin Bread.
Jump to:
Ingredients
There are only a few ingredients you'll need to bring this bread together.
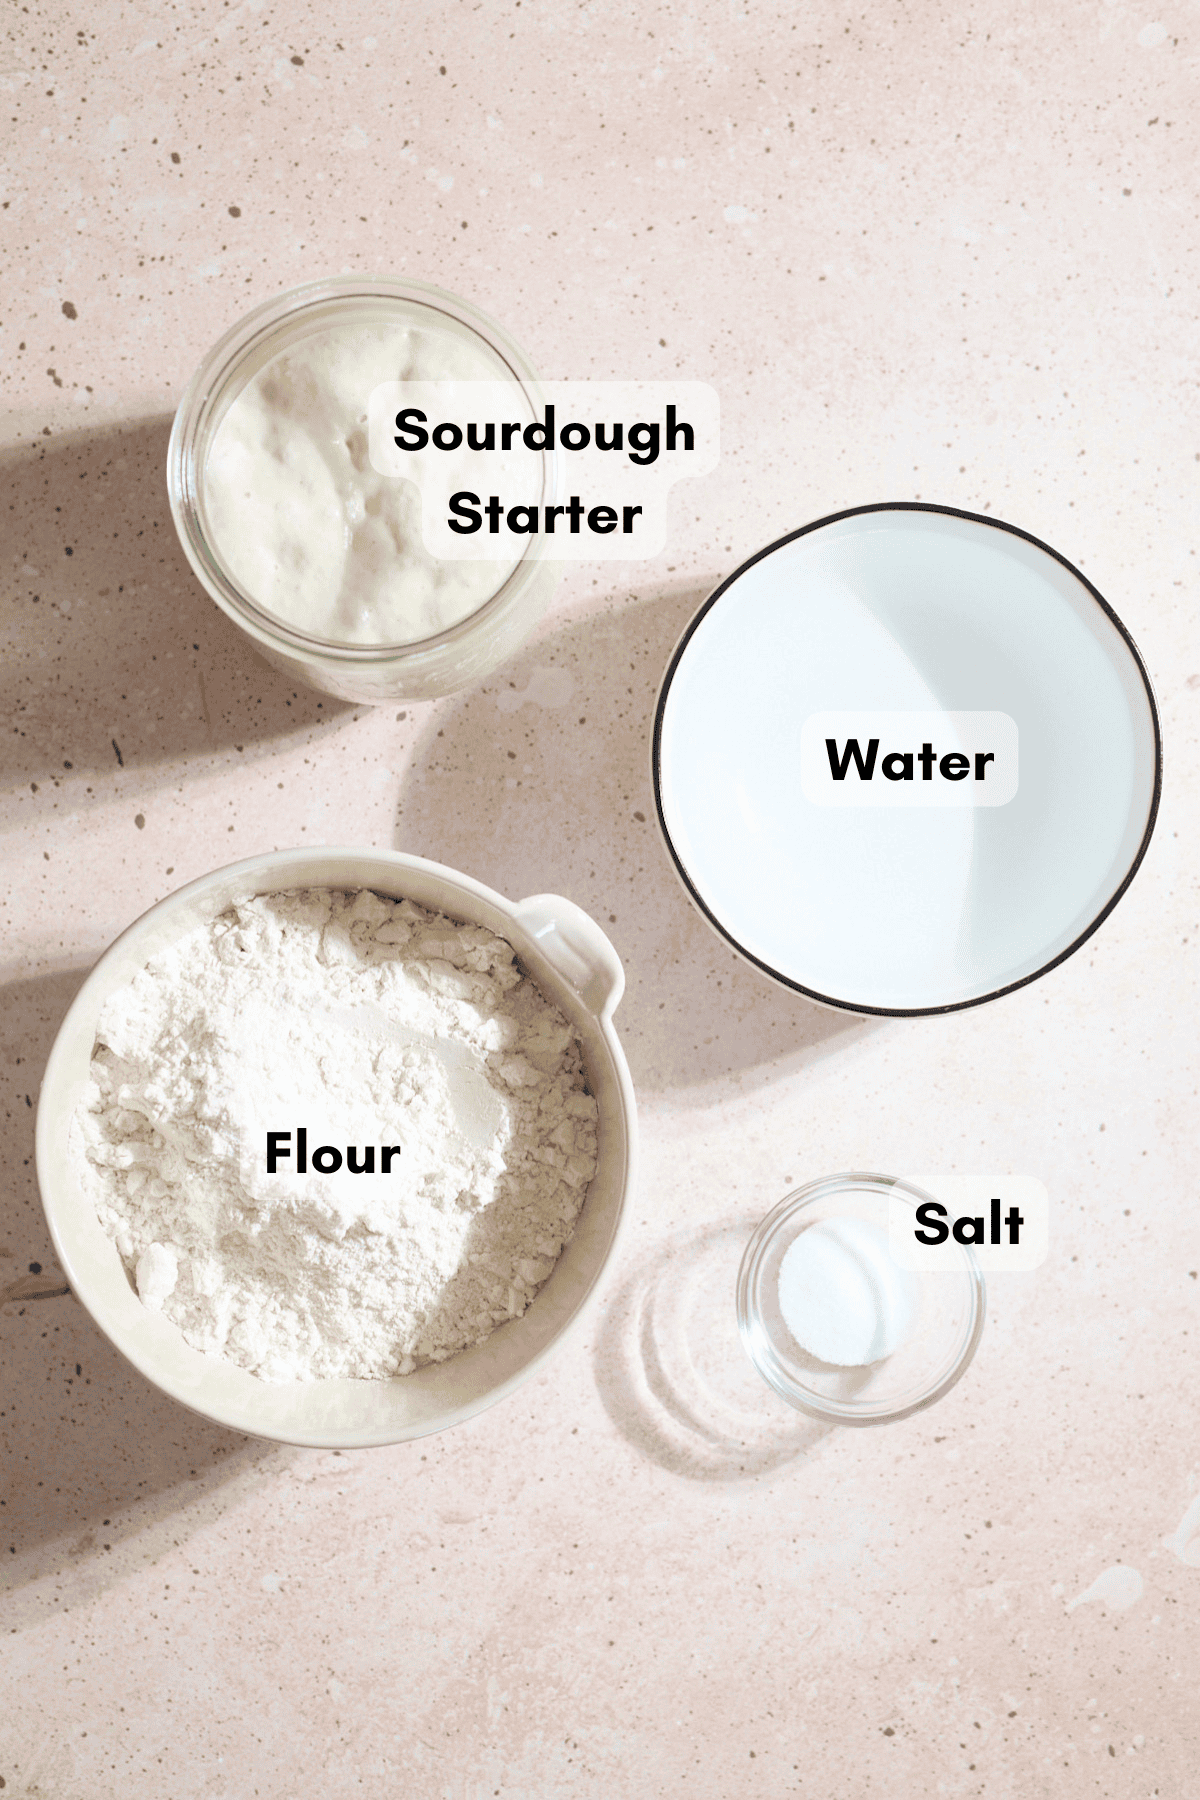
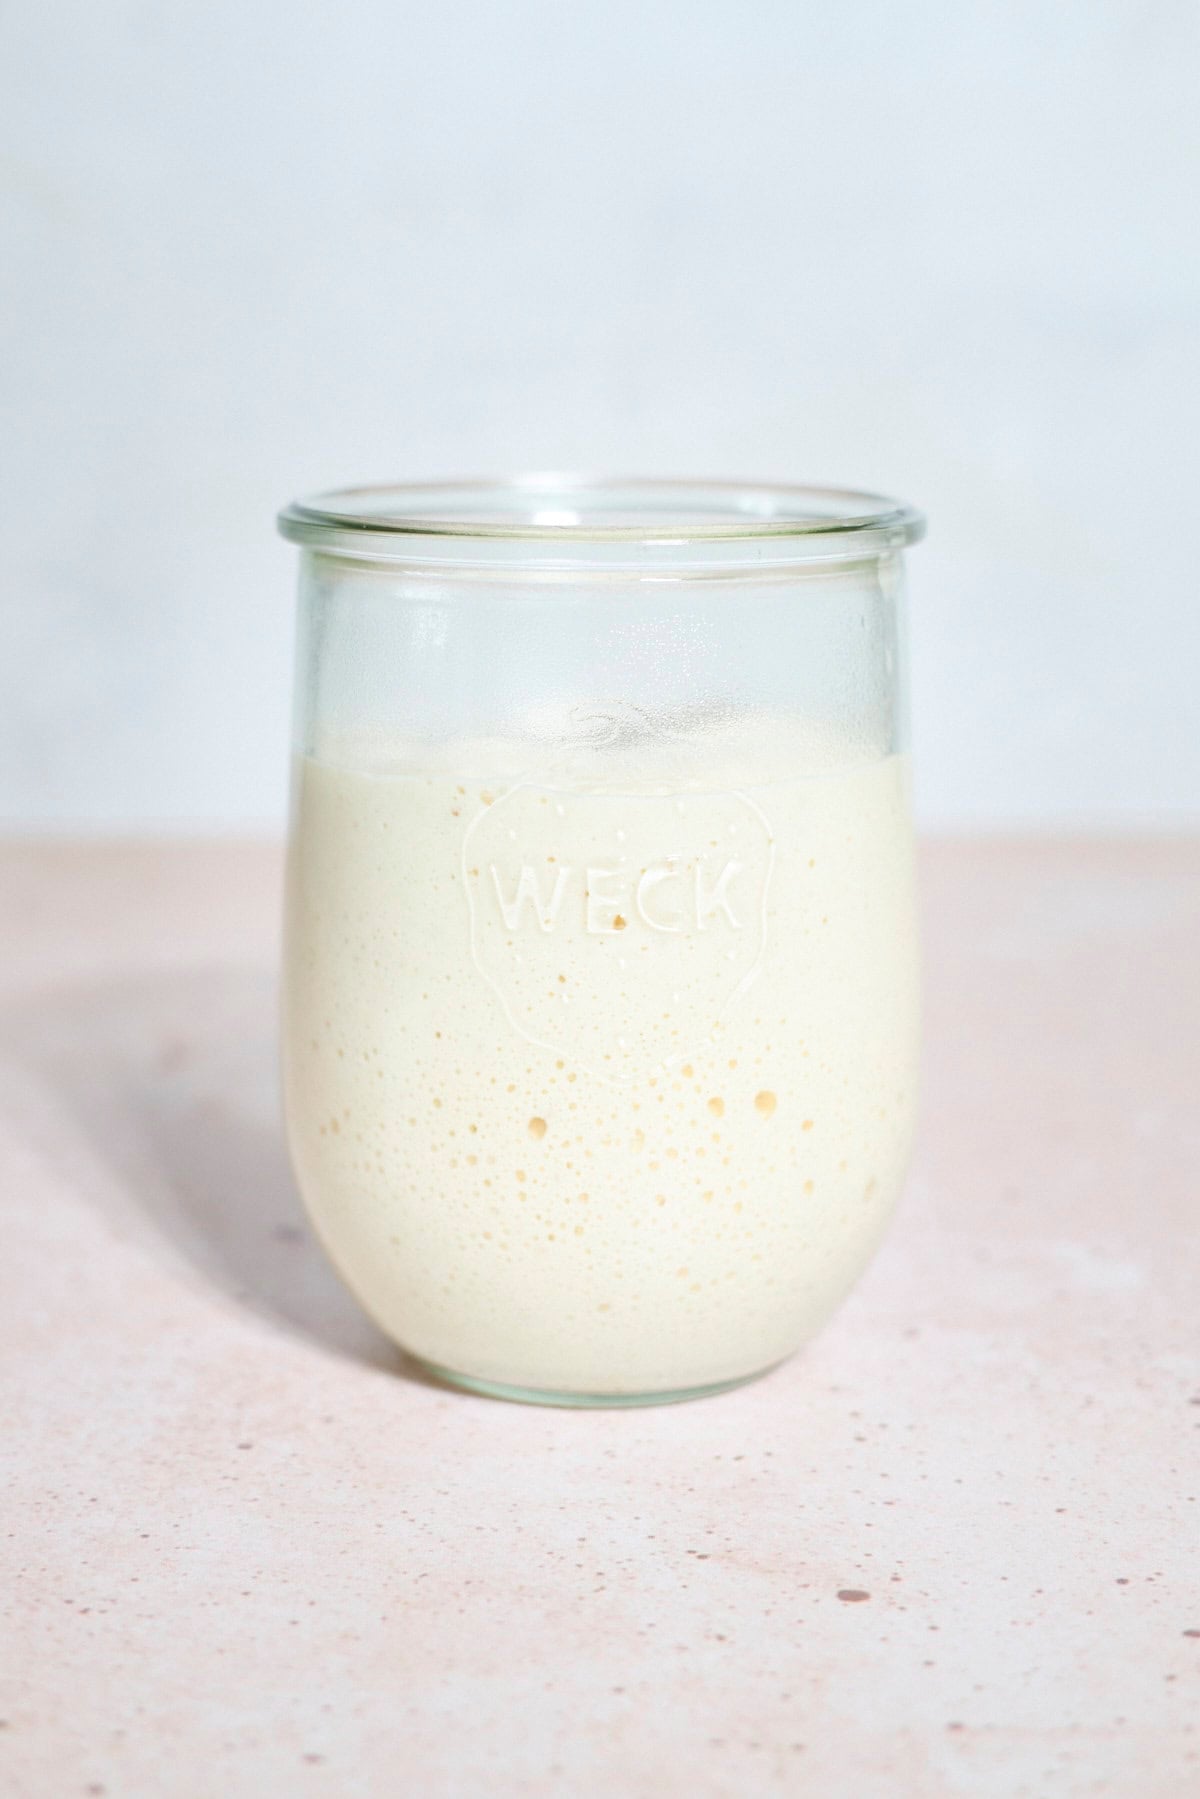
- Sourdough starter: The first step of this recipe will be to feed your sourdough starter. Your starter should be healthy, but unfed (hungry). This recipe is designed for a sourdough starter with a 1:1 ratio (when you feed your starter, it's with 1 part flour and 1 part water). If your starter uses a different ratio, you may need to adjust some of the ingredients in this recipe.
- Learn more about how to make a sourdough starter.
See full recipe below for detailed directions.
Substitutions & Variations
This is a very adaptable recipe, and a great base recipe. Below are a few easy substitutions and variations you can try.
- Add inclusions - Try adding some of your favorite inclusions! Typically, you'll want to add these during the first set of stretch and folds so they can evenly disperse as you continue to stretch and fold the dough.
- Make a sourdough discard bread - If your sourdough starter isn't quite ready to make a loaf yet, you can still make this Easy Sourdough Discard Bread!
How to Make Easy Sourdough Discard Bread
There are only a few key steps to bring this bread together. The full recipe with detailed directions is at the bottom of this post.
- Step 1: Feed your sourdough starter.
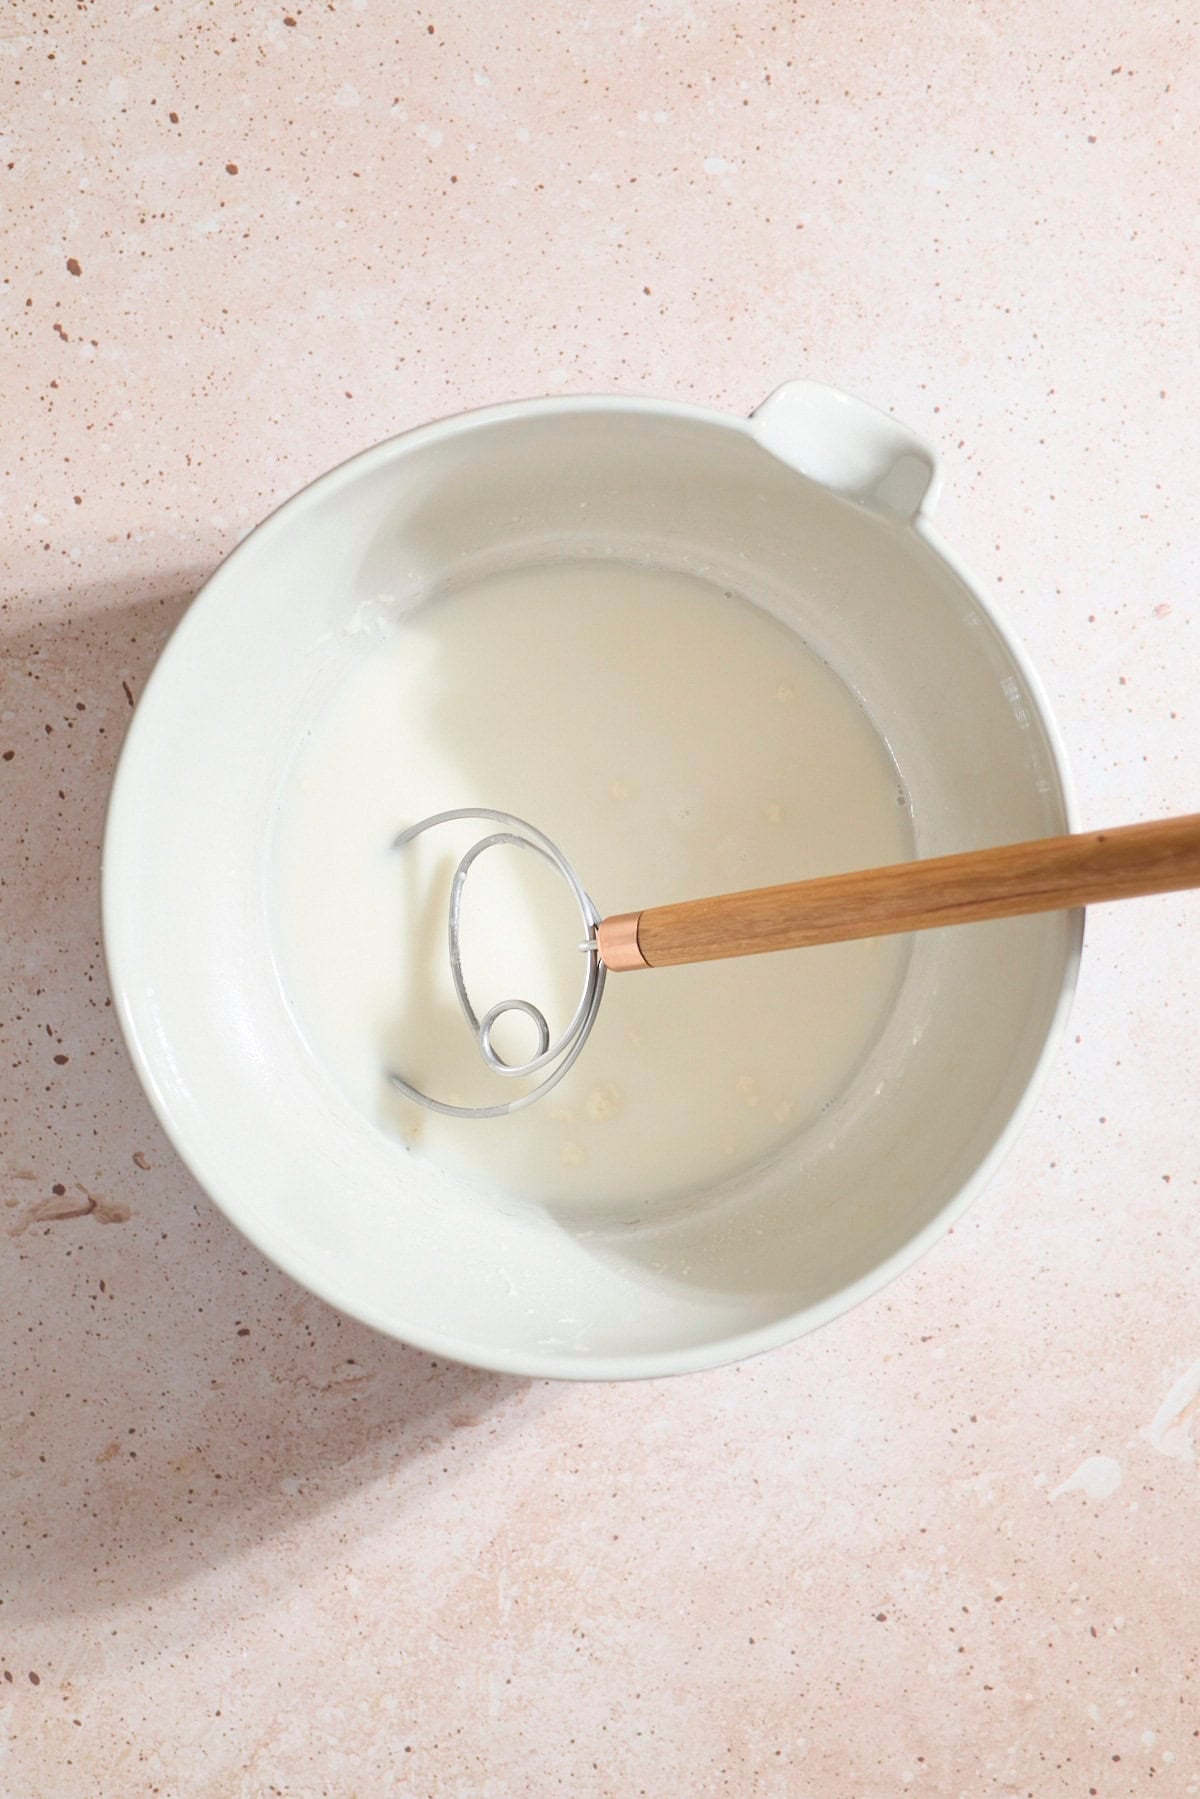
- Step 2: Mix together the dough ingredients in a large bowl using a dough whisk or a wooden spoon.

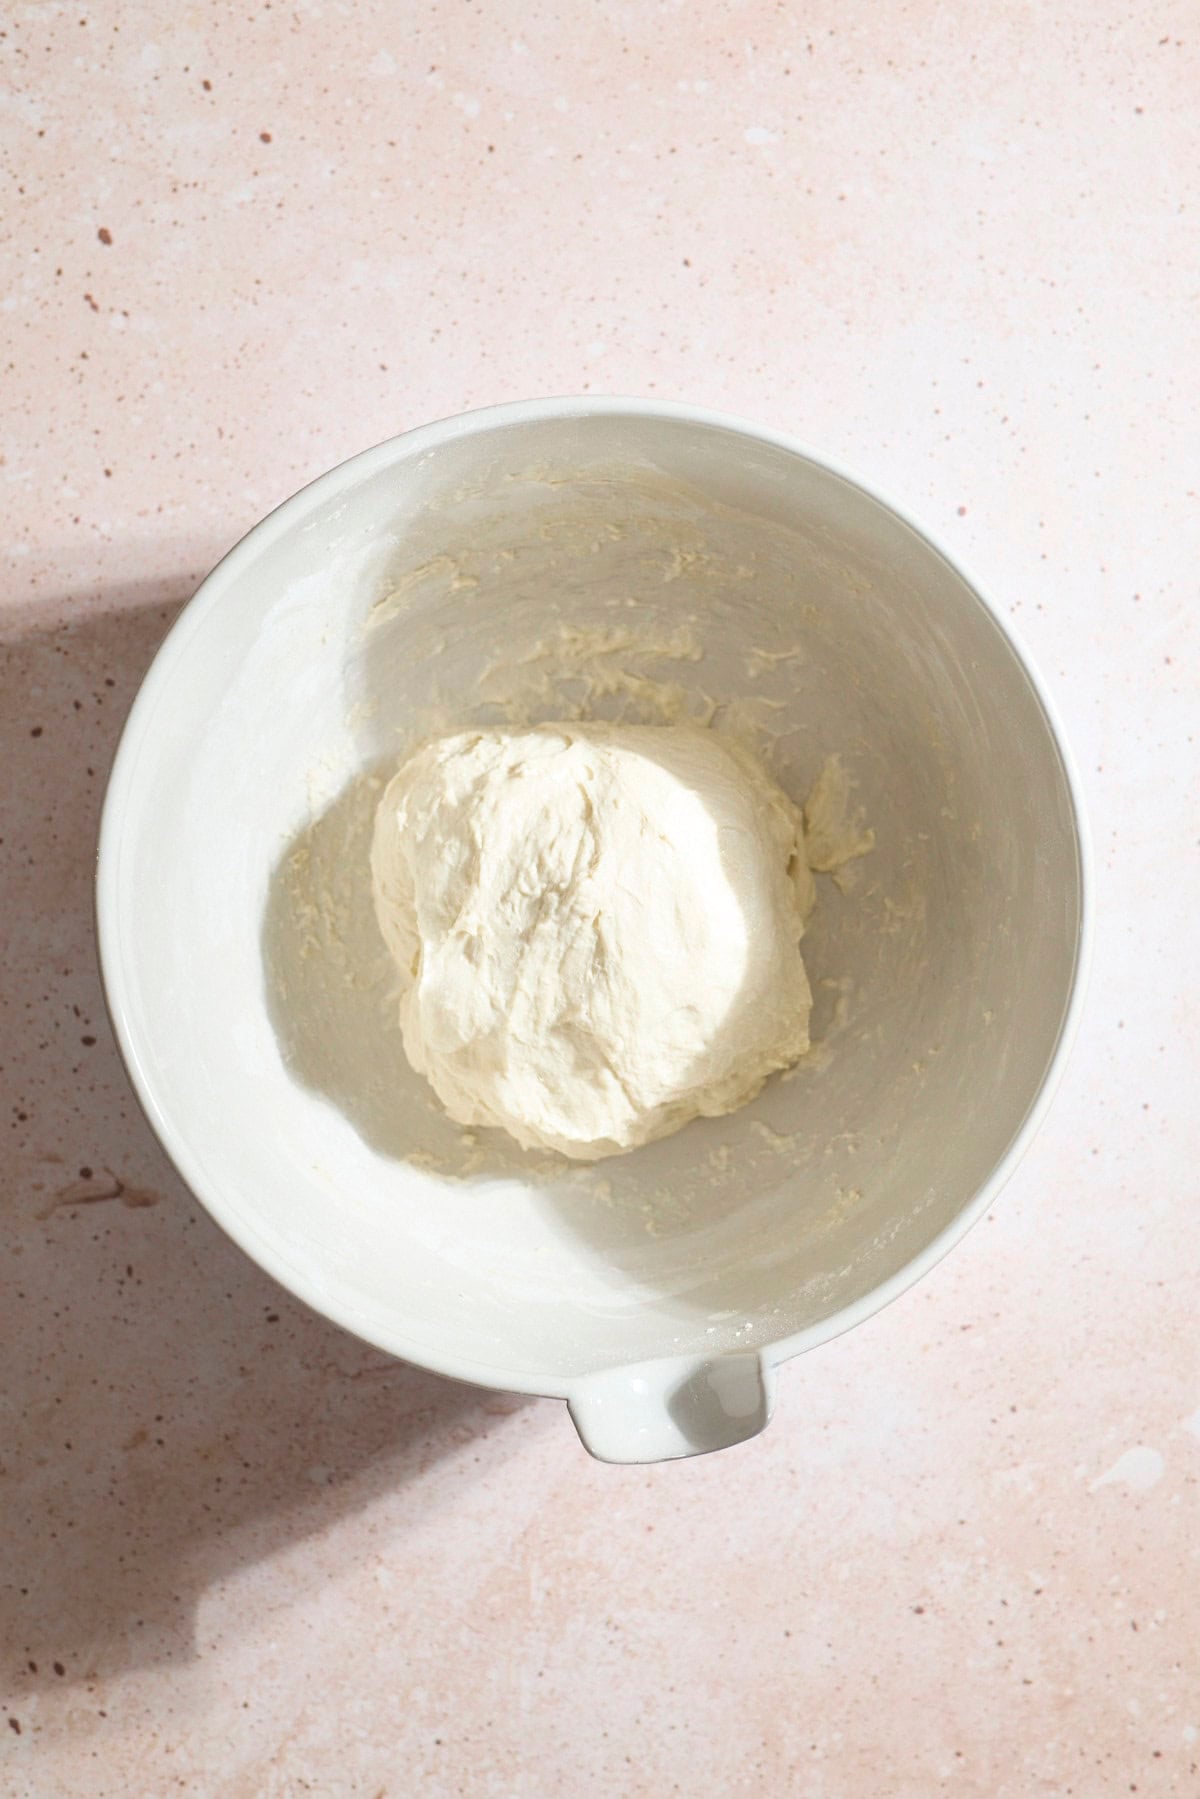
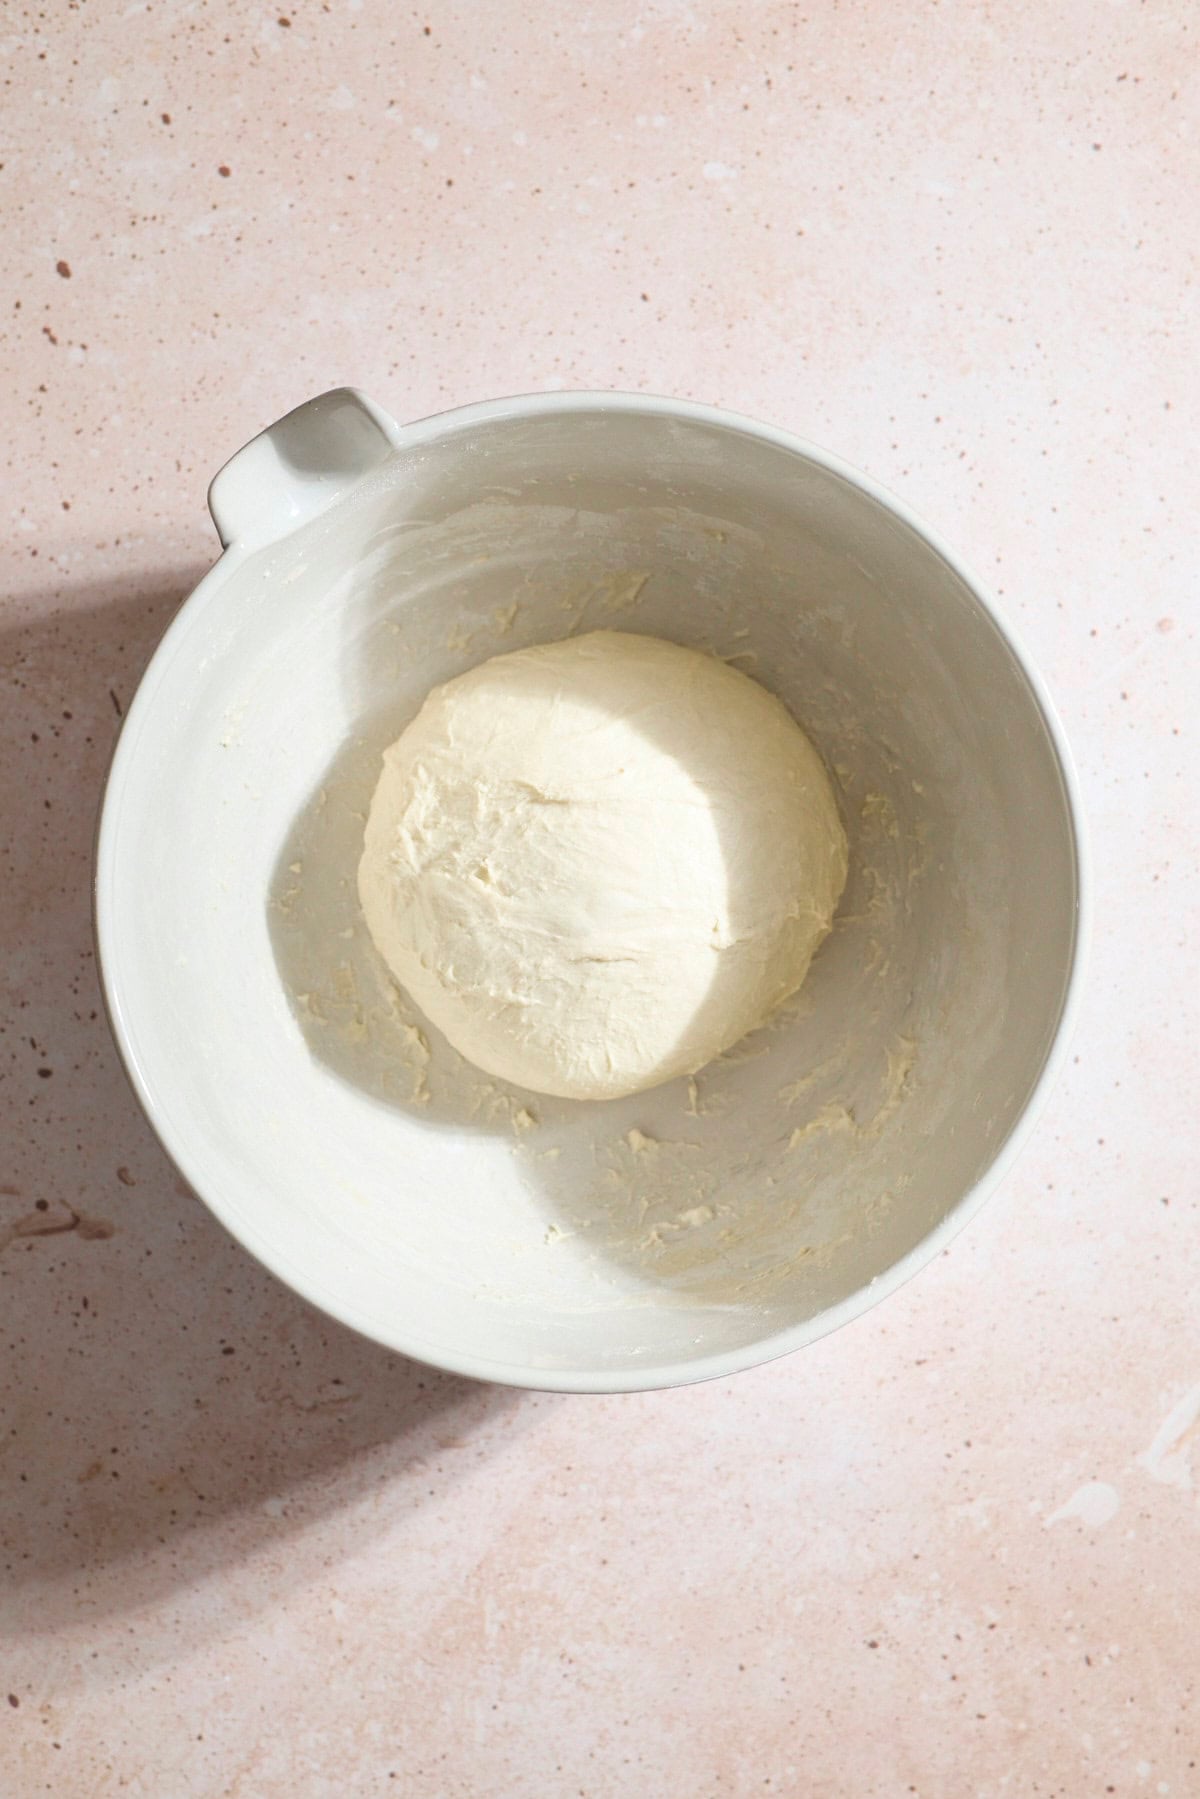
- Step 3: Add the flour and salt and mix until a shaggy dough forms. Do a few sets of slap and folds to help develop the gluten structure. Cover and let rest in a warm spot for 30 minutes.

- Step 4: Complete three sets of stretch and folds every 30-45 minutes. Lightly wet your hands, then stretch one side of the dough up.
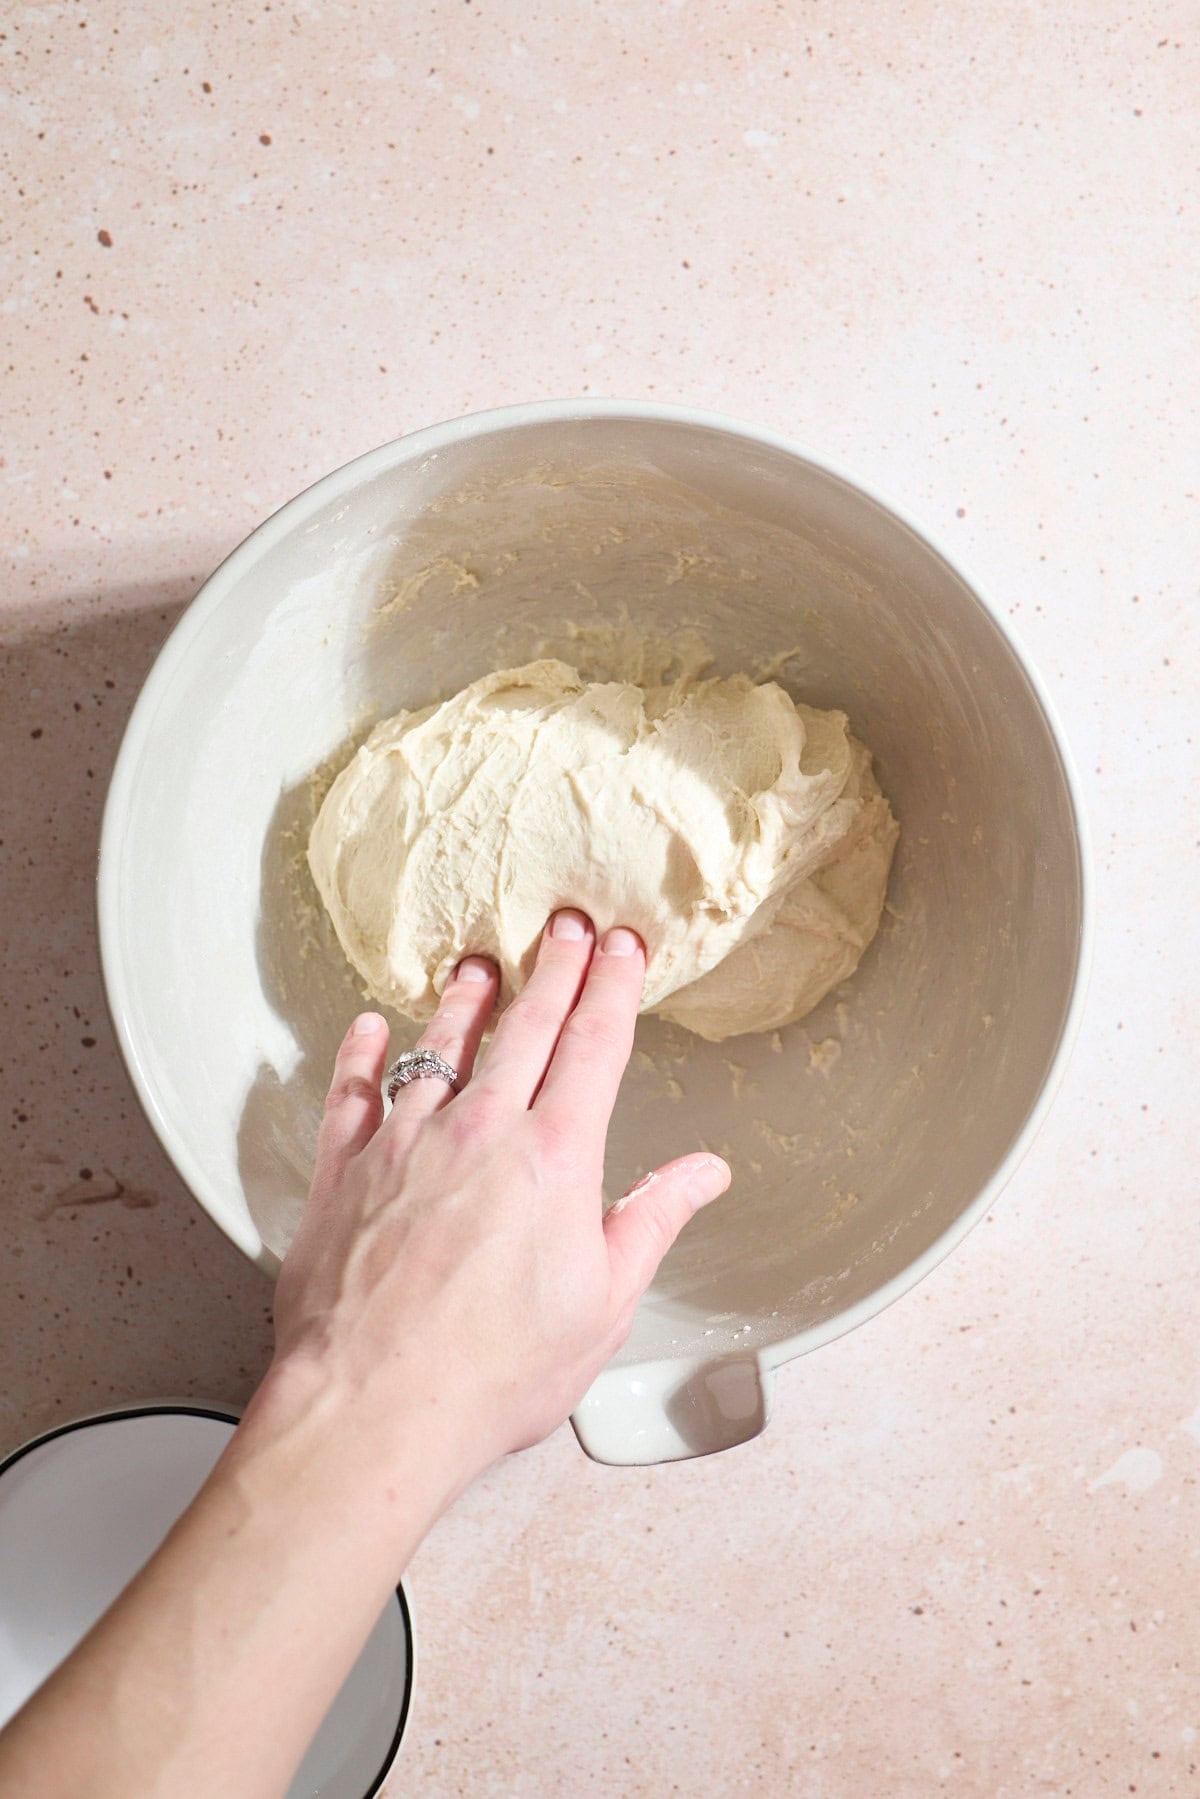
- Step 5: Fold the dough over onto itself. Rotate the bowl and repeat, making 4-5 stretch and folds around the bowl. Re-cover the bowl and let rest in a warm spot.
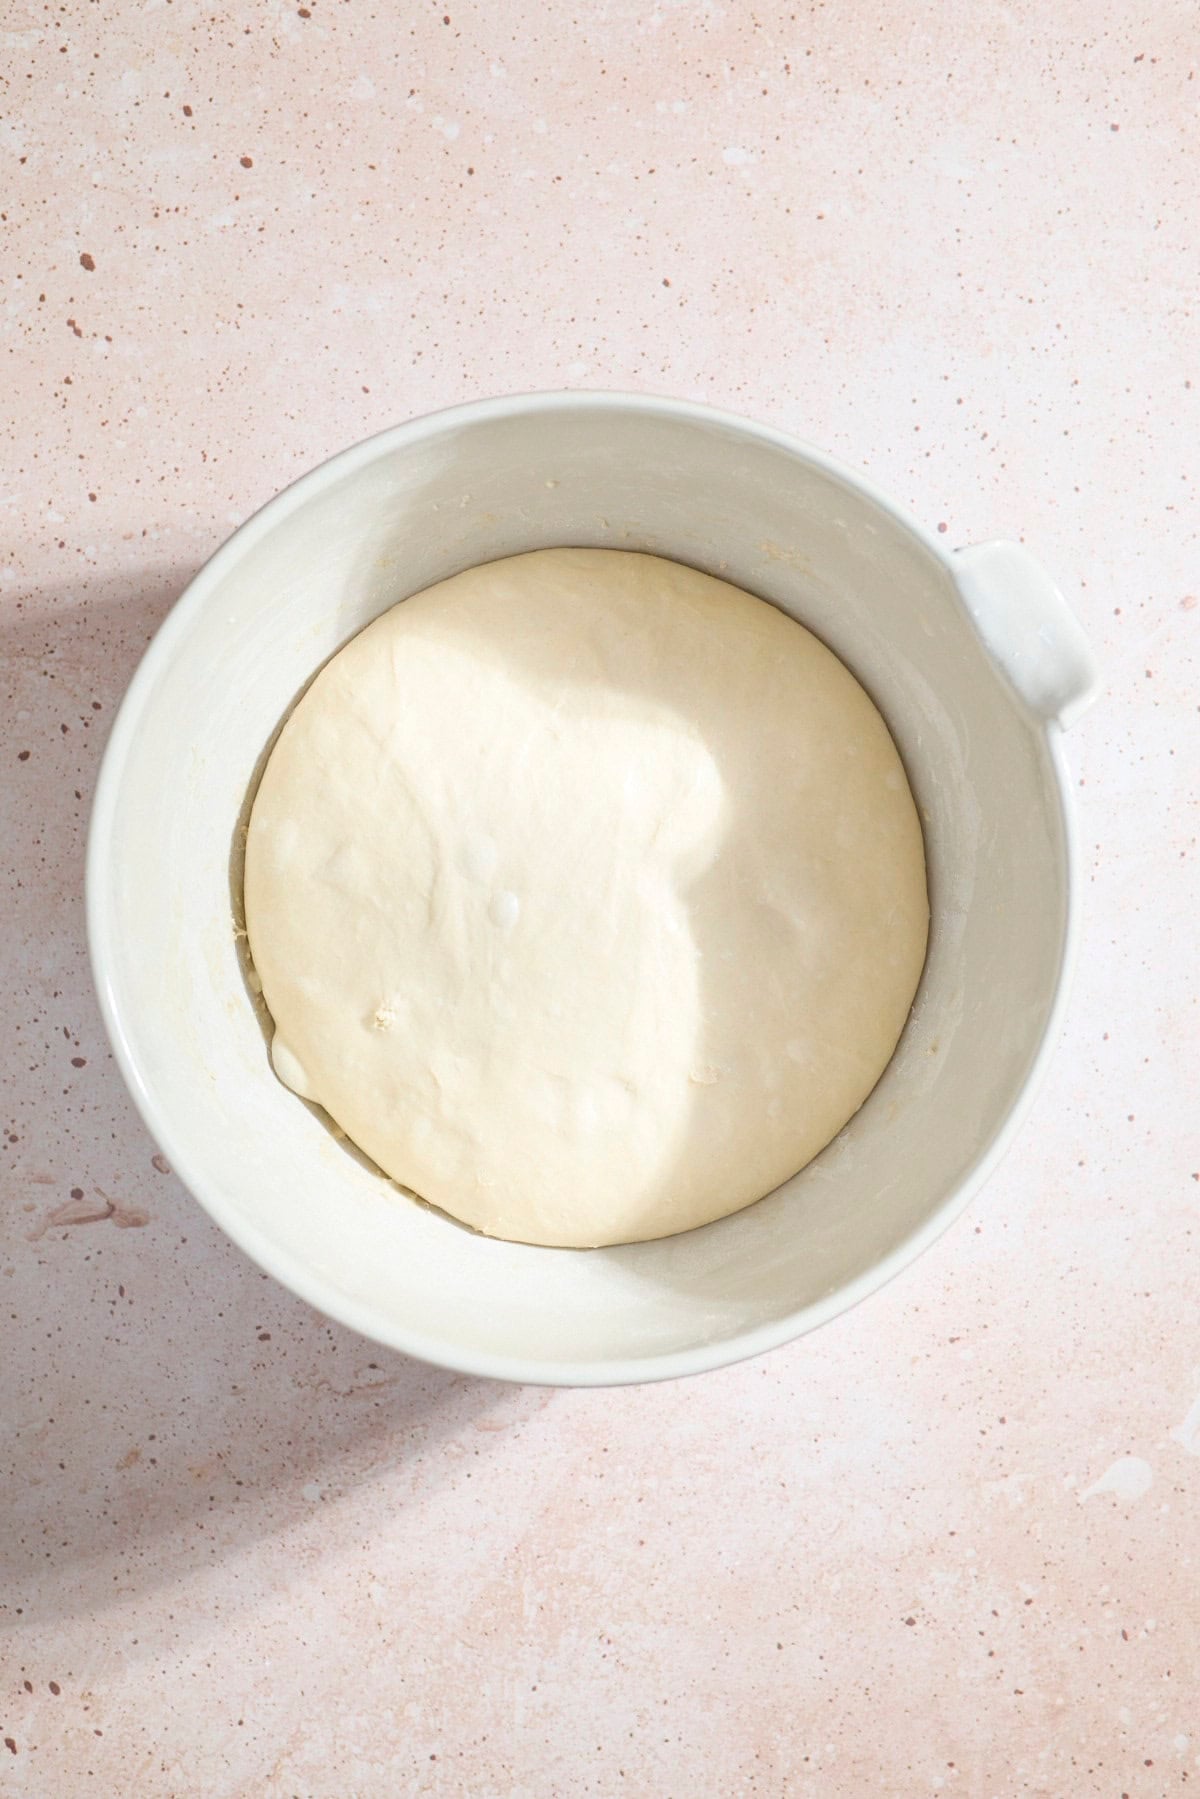
- Step 6: After the last stretch and folds, cover the bowl and finish the bulk fermentation. The dough will be jiggly, domed, and with bubbles forming on the surface.
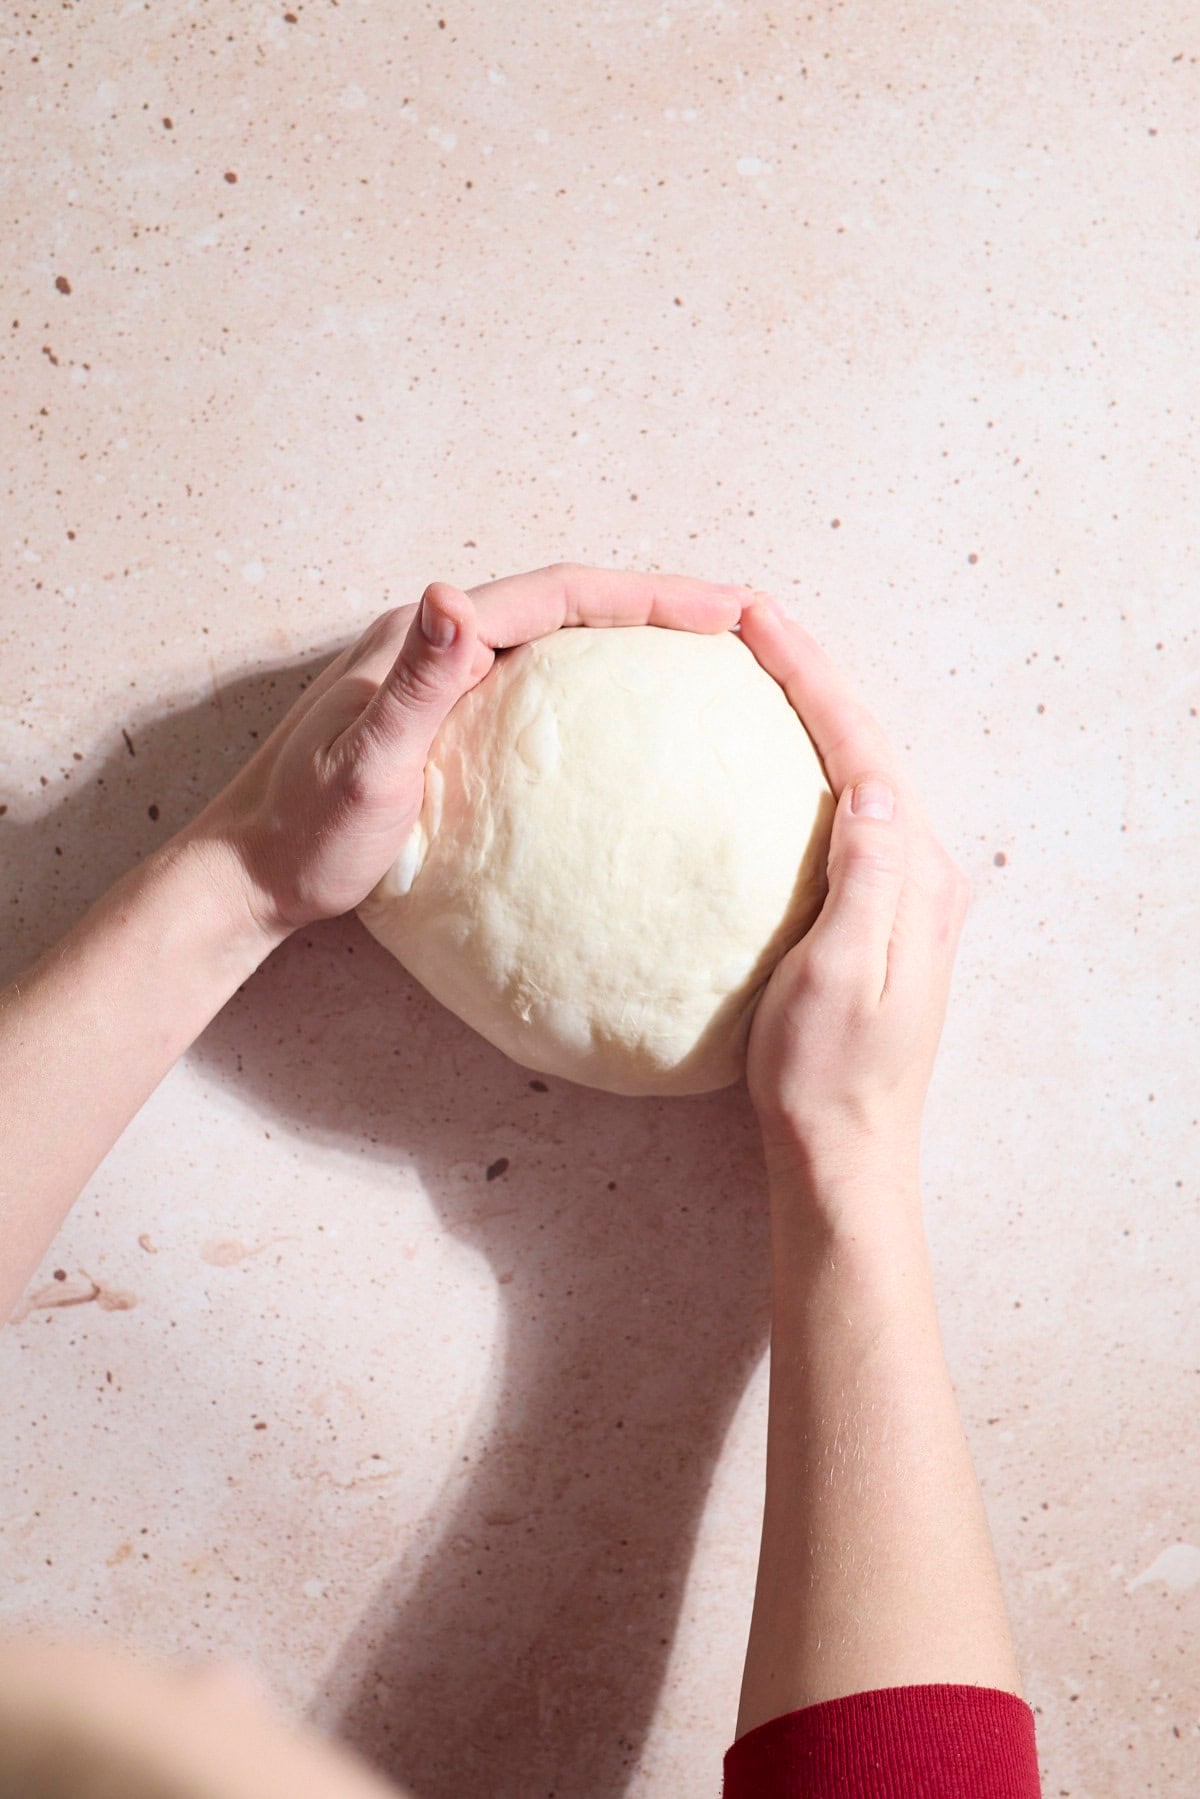
- Step 7: Shape the dough into a smooth ball, creating surface tension on the dough.
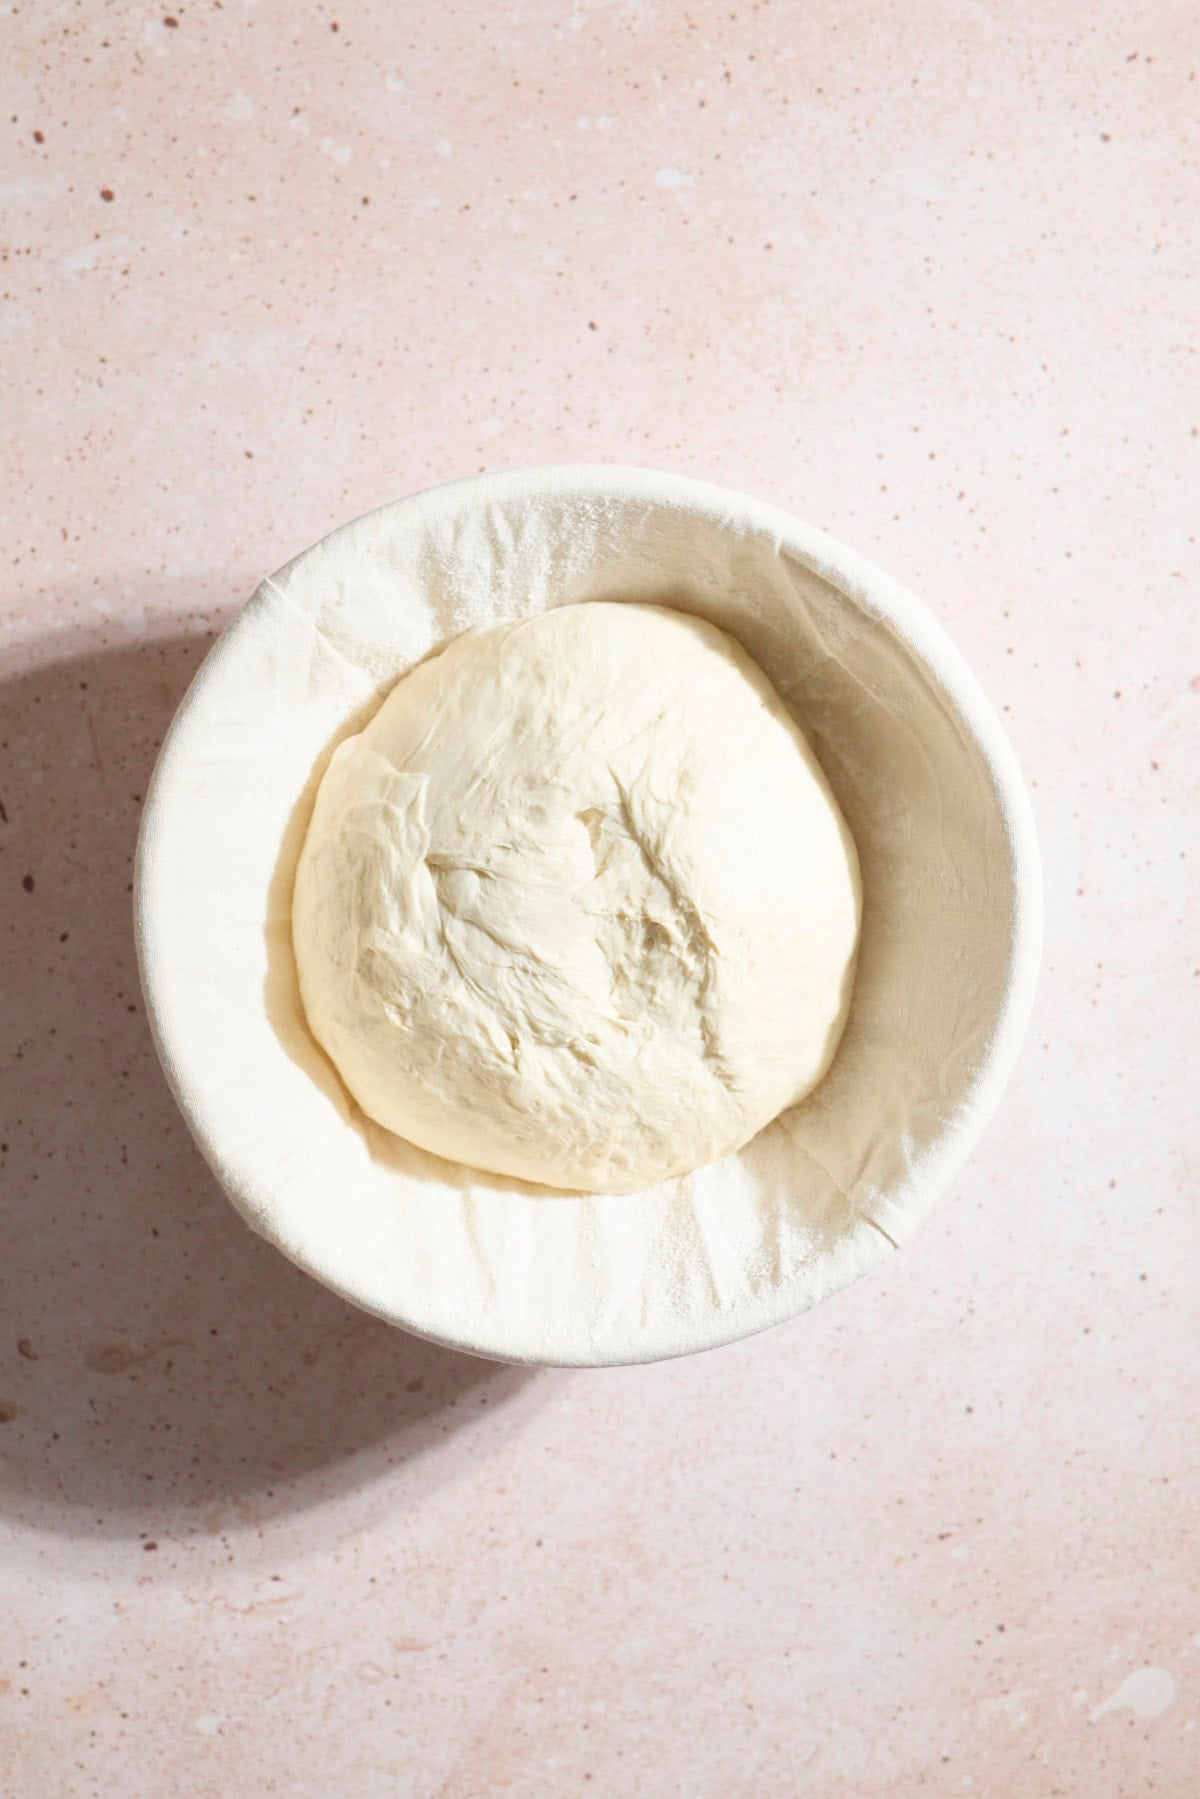
- Step 8: Transfer to a floured banetton. Cover and let rise 1-3 hours until the dough passes the poke test.
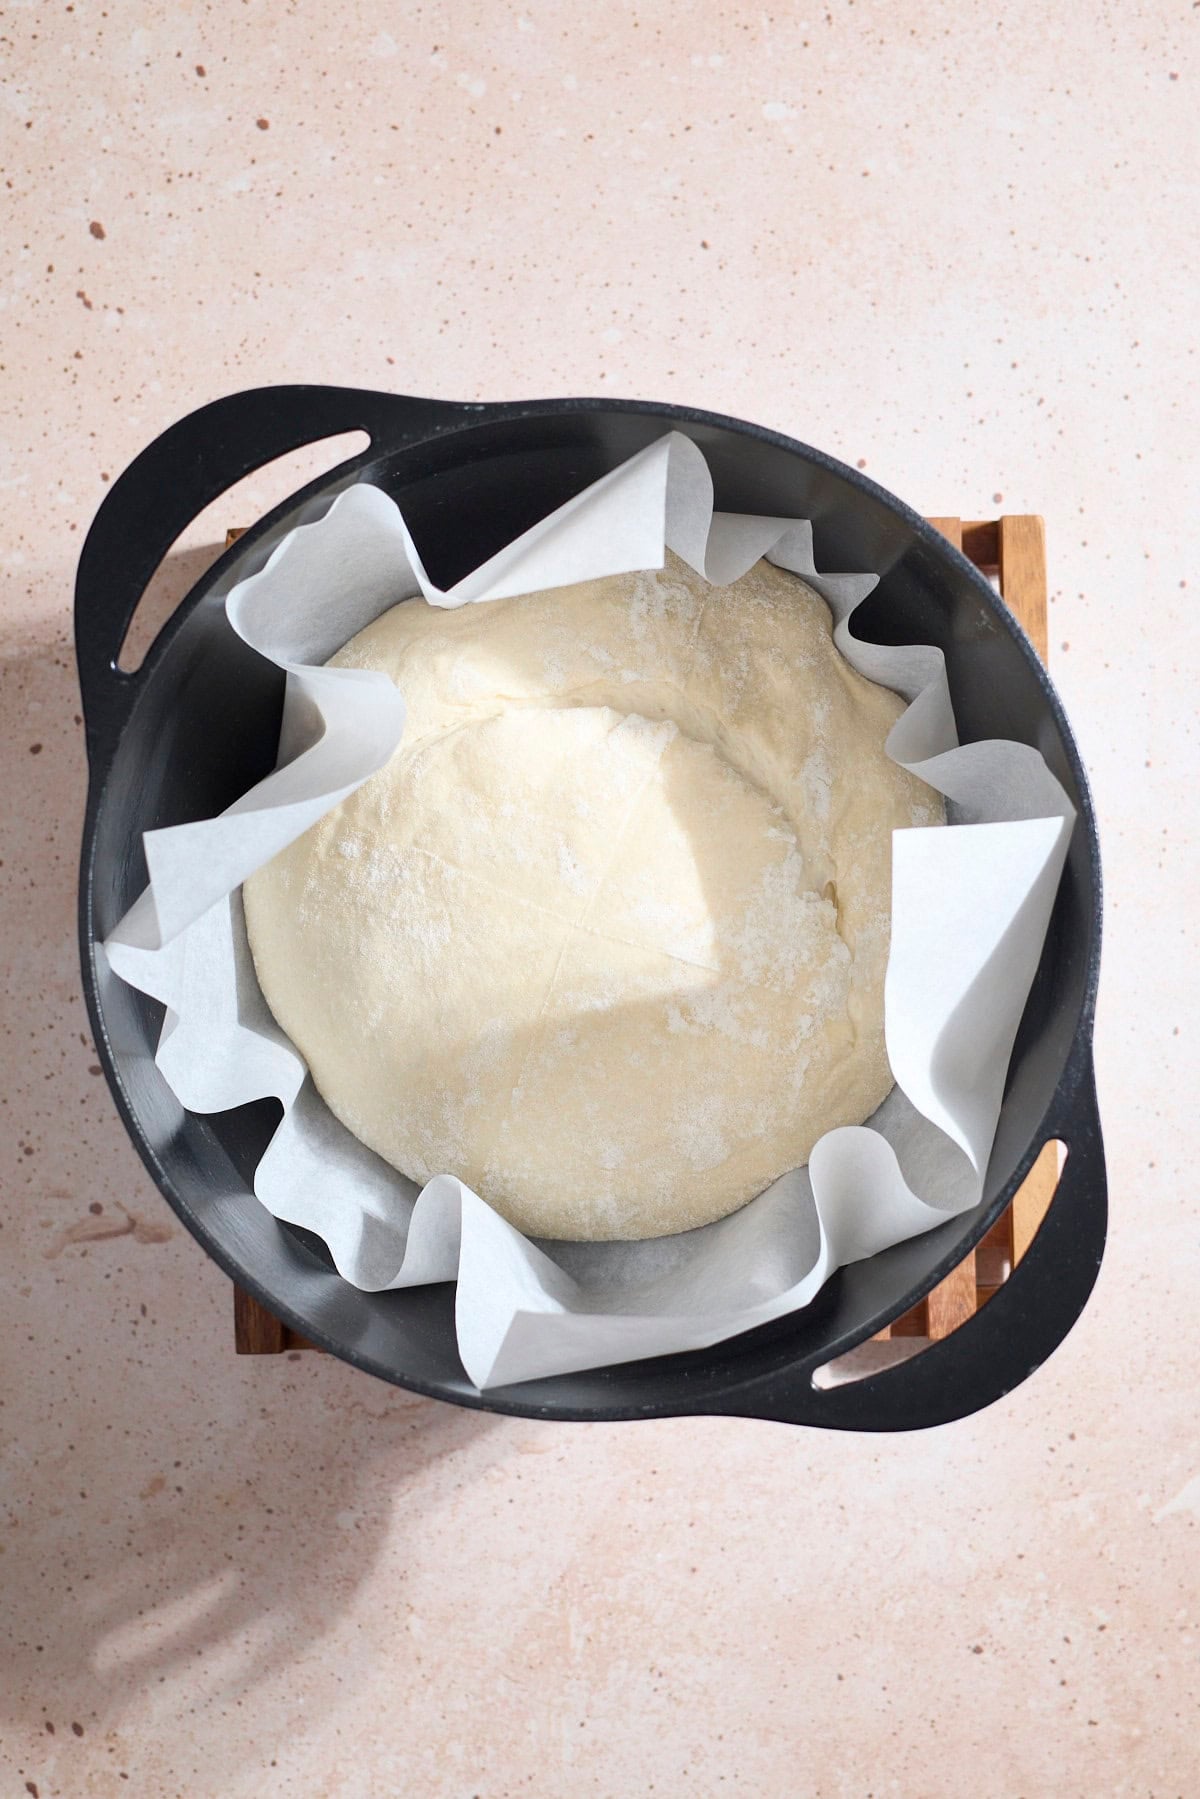
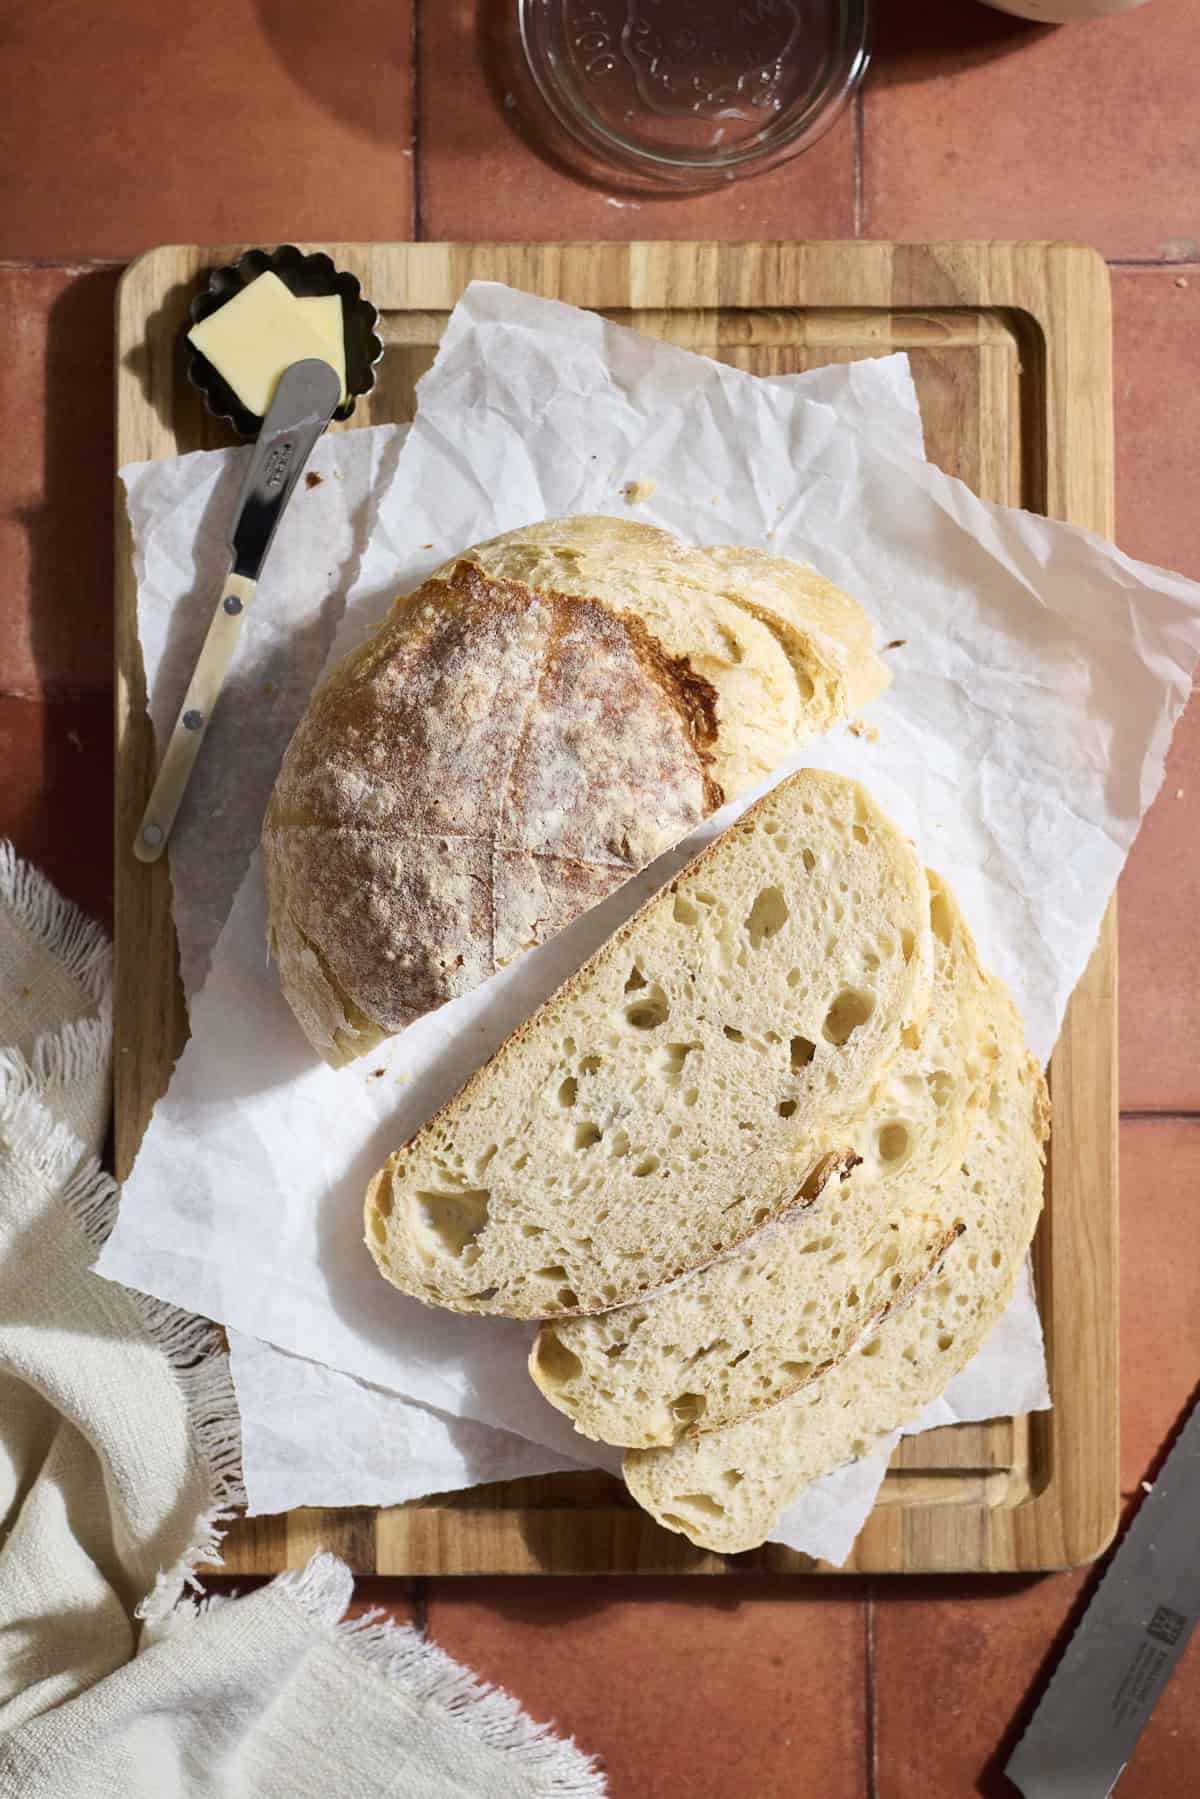
- Step 9: Transfer the dough to a piece of parchment paper, score, then place the dough and parchment paper in your pre-heated Dutch oven.
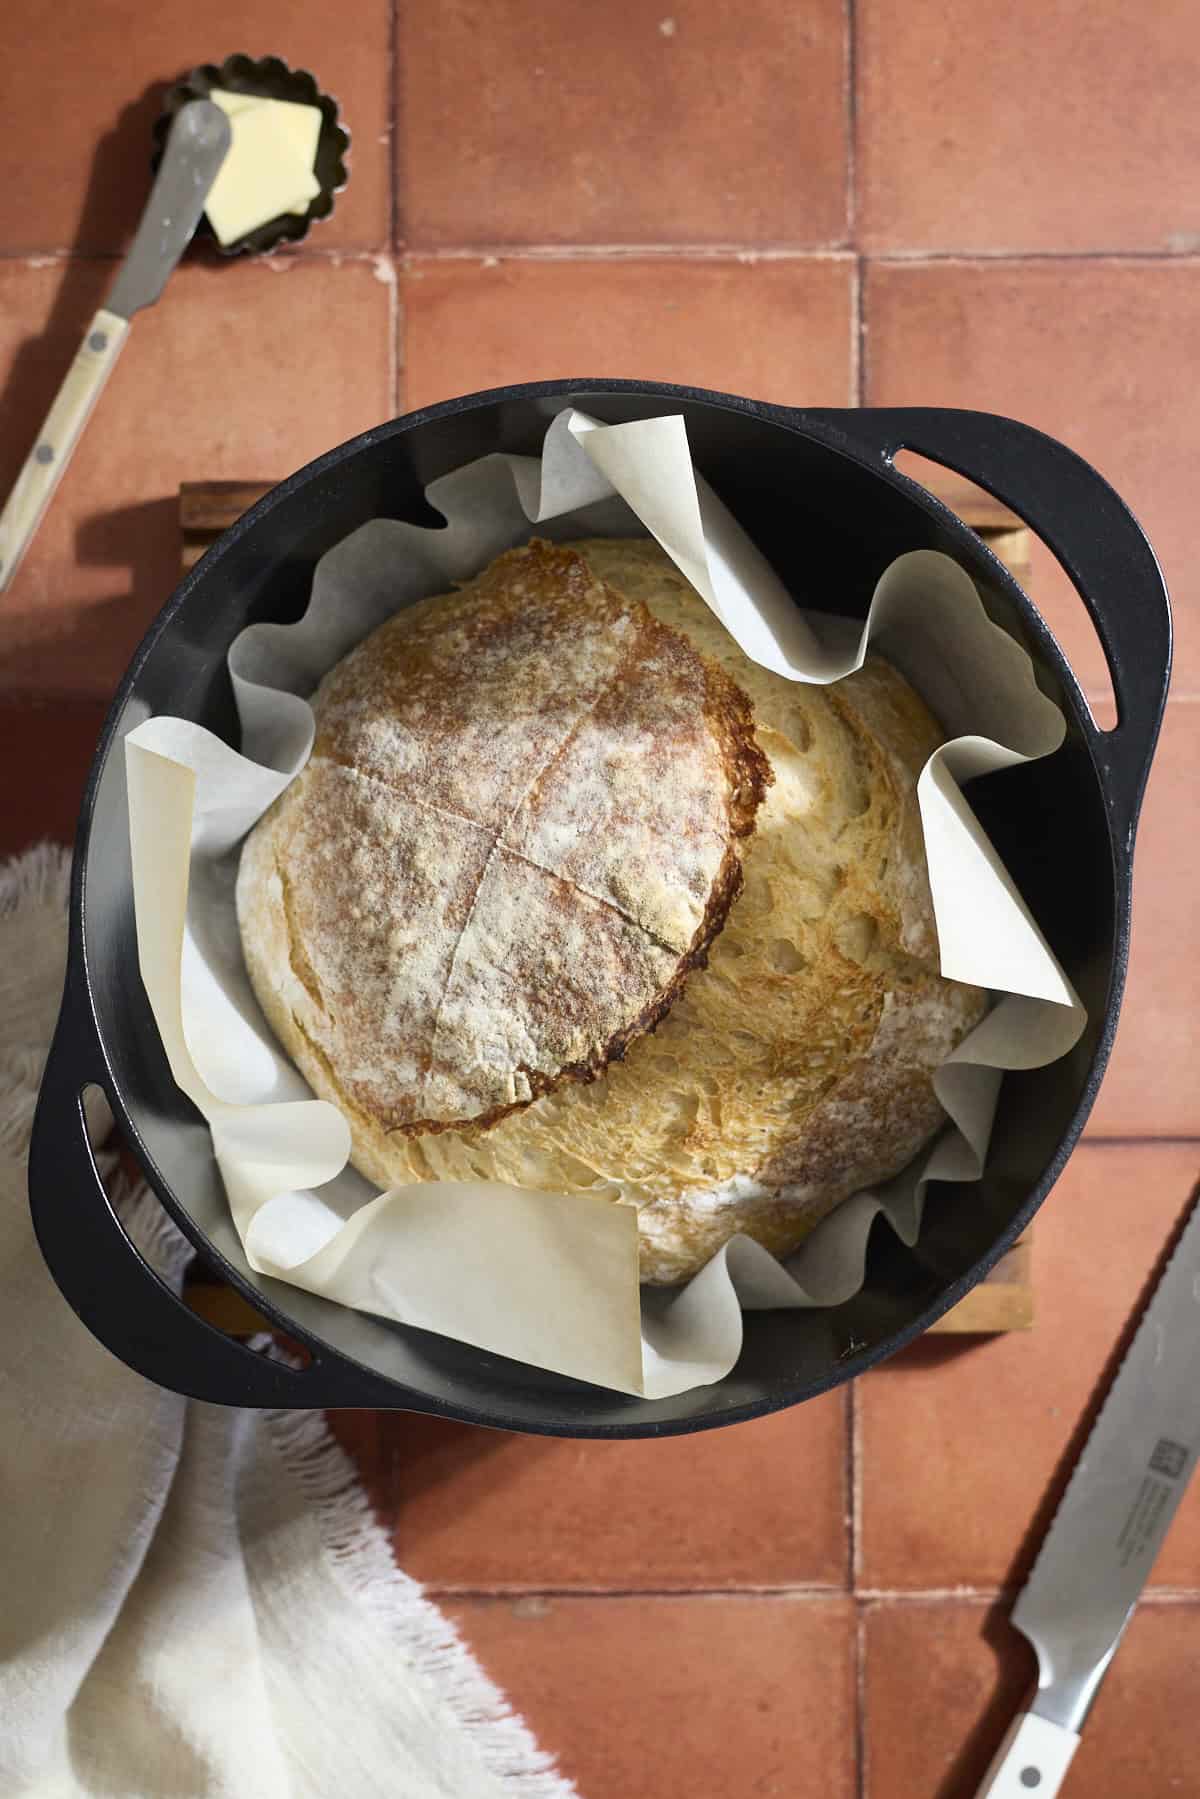
- Step 10: Cover and bake for 25 minutes, then uncover and bake for an additional 15-20 minutes. Let the loaf cool fully before slicing.
Expert Baking Tips
- Use metric measurements. I'm not even listing the ingredients in cups here, but using metric measurements is much more accurate for baking, particularly for sourdough. Hopefully you already have one, but you will need a kitchen scale.
- You're going to need to get to know your dough. Part of bread baking is understanding what dough looks like, how it behaves, and how your starter behaves, and the impact your environment has on your dough. With other baking recipes, it's easy to say "mix until light and fluffy, about 2-3 minutes." But with bread, it's more about the look and feel of the dough than it is about a certain set timeframe.
- The bulk fermentation time is going to vary depending on the temperature of your dough and the temperature of your room. Using warm water and keeping the dough in a warm spot is going to keep the process moving.
- Worst case, if your dough is not rising and needs more time, give it more time! Let it rise at room temperature overnight and see how it looks in the morning (over-fermented dough is way better than under-fermented dough).
- When in doubt, bake it! Worried that you might've overfermented the dough? Or not shaped correctly? Or something else? Pop it in the Dutch oven and bake it anyhow! You never know - your bread may surprise you!
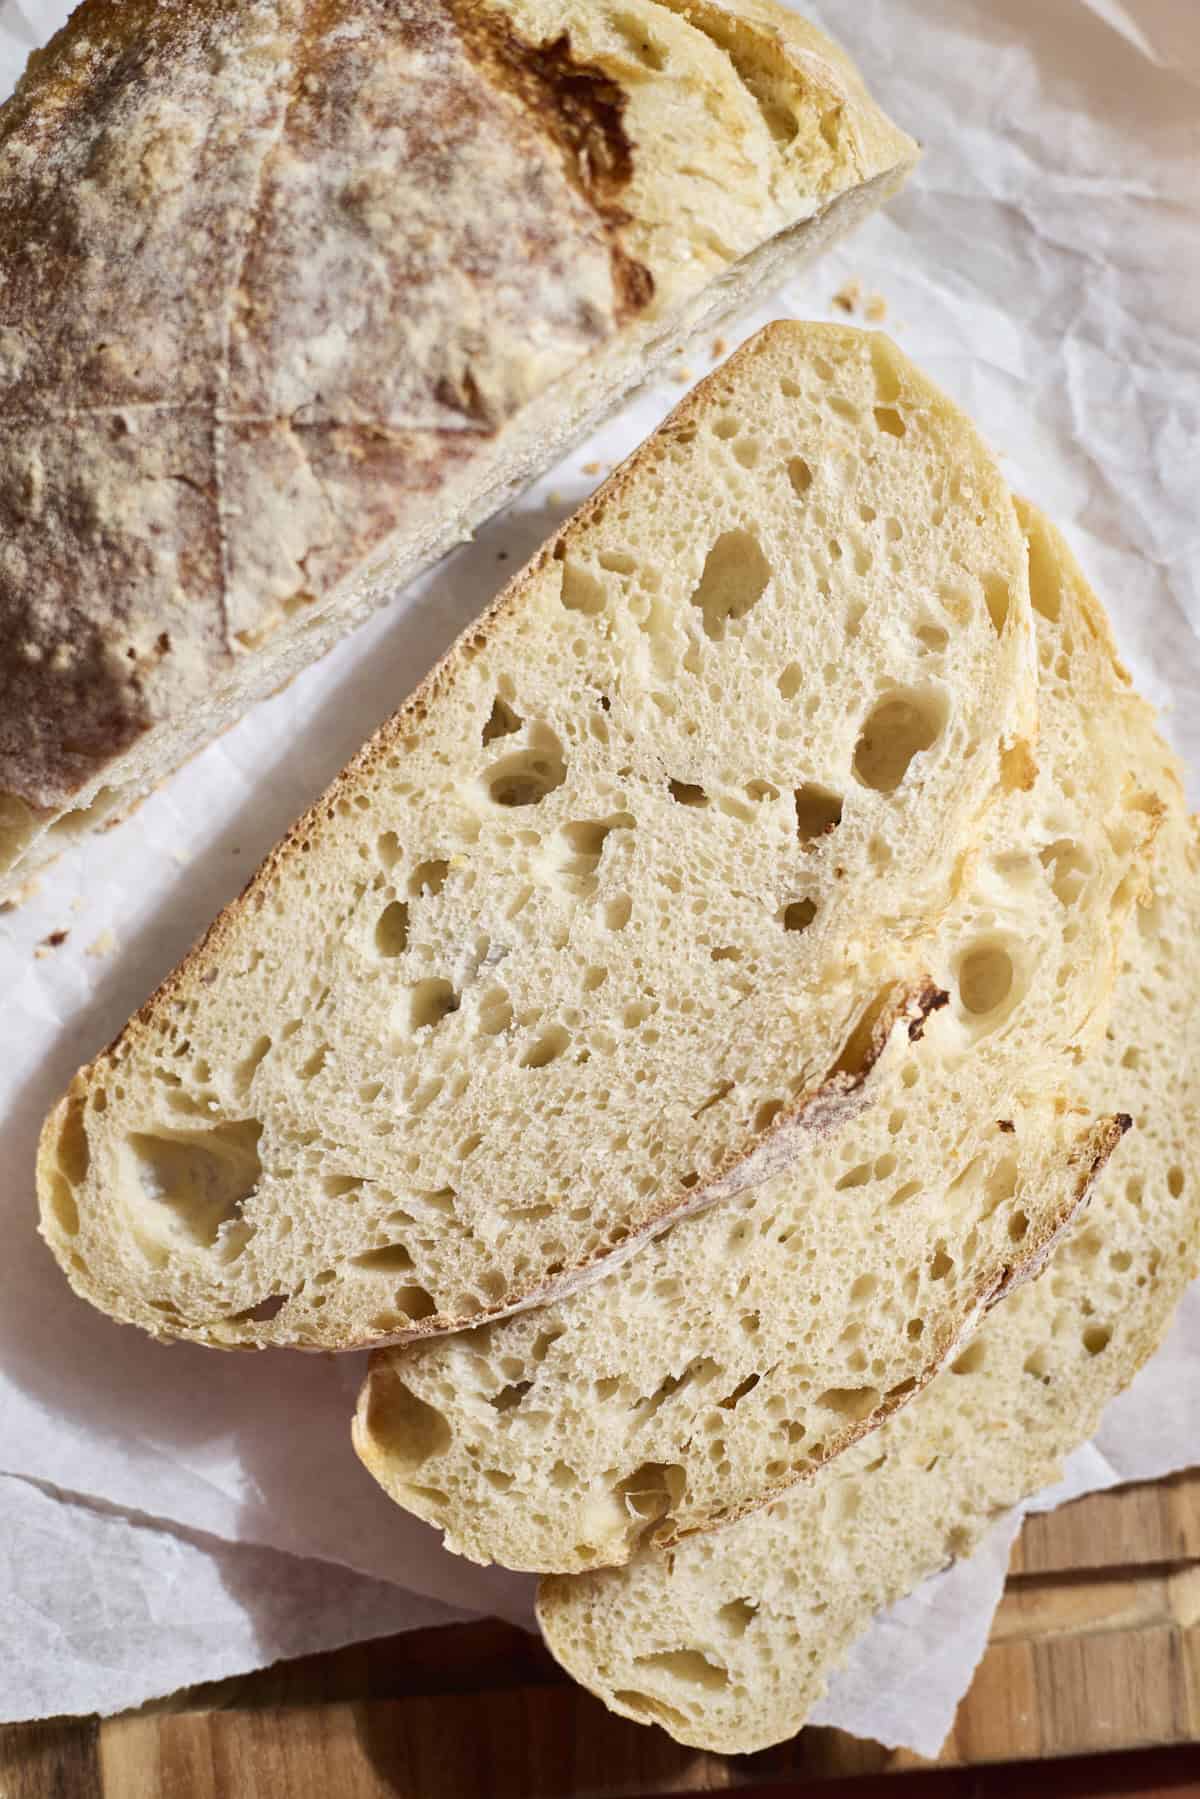
- Let the loaf cool before slicing. If you cut into a warm loaf of bread, it's harder to cut, and it's not completely finished baking yet (you'll see a lot of steam escape).
Stretch & Folds
Throughout the stretch and fold process, you're developing the gluten structure for the loaf. This helps the loaf hold its shape and create those airy bubbles we know and love. As you complete the three sets, you'll notice your dough gets smoother, holds its shape better, and starts to look more easily rounded.
After the third set of stretch and folds, the dough should pass the windowpane test. When you stretch a small piece of dough, it should stretch to the point that light can pass through it without the dough ripping. If it doesn't seem like it's there yet, repeat this process for a fourth set of stretch and folds.
Dough after the first set of stretch and folds.
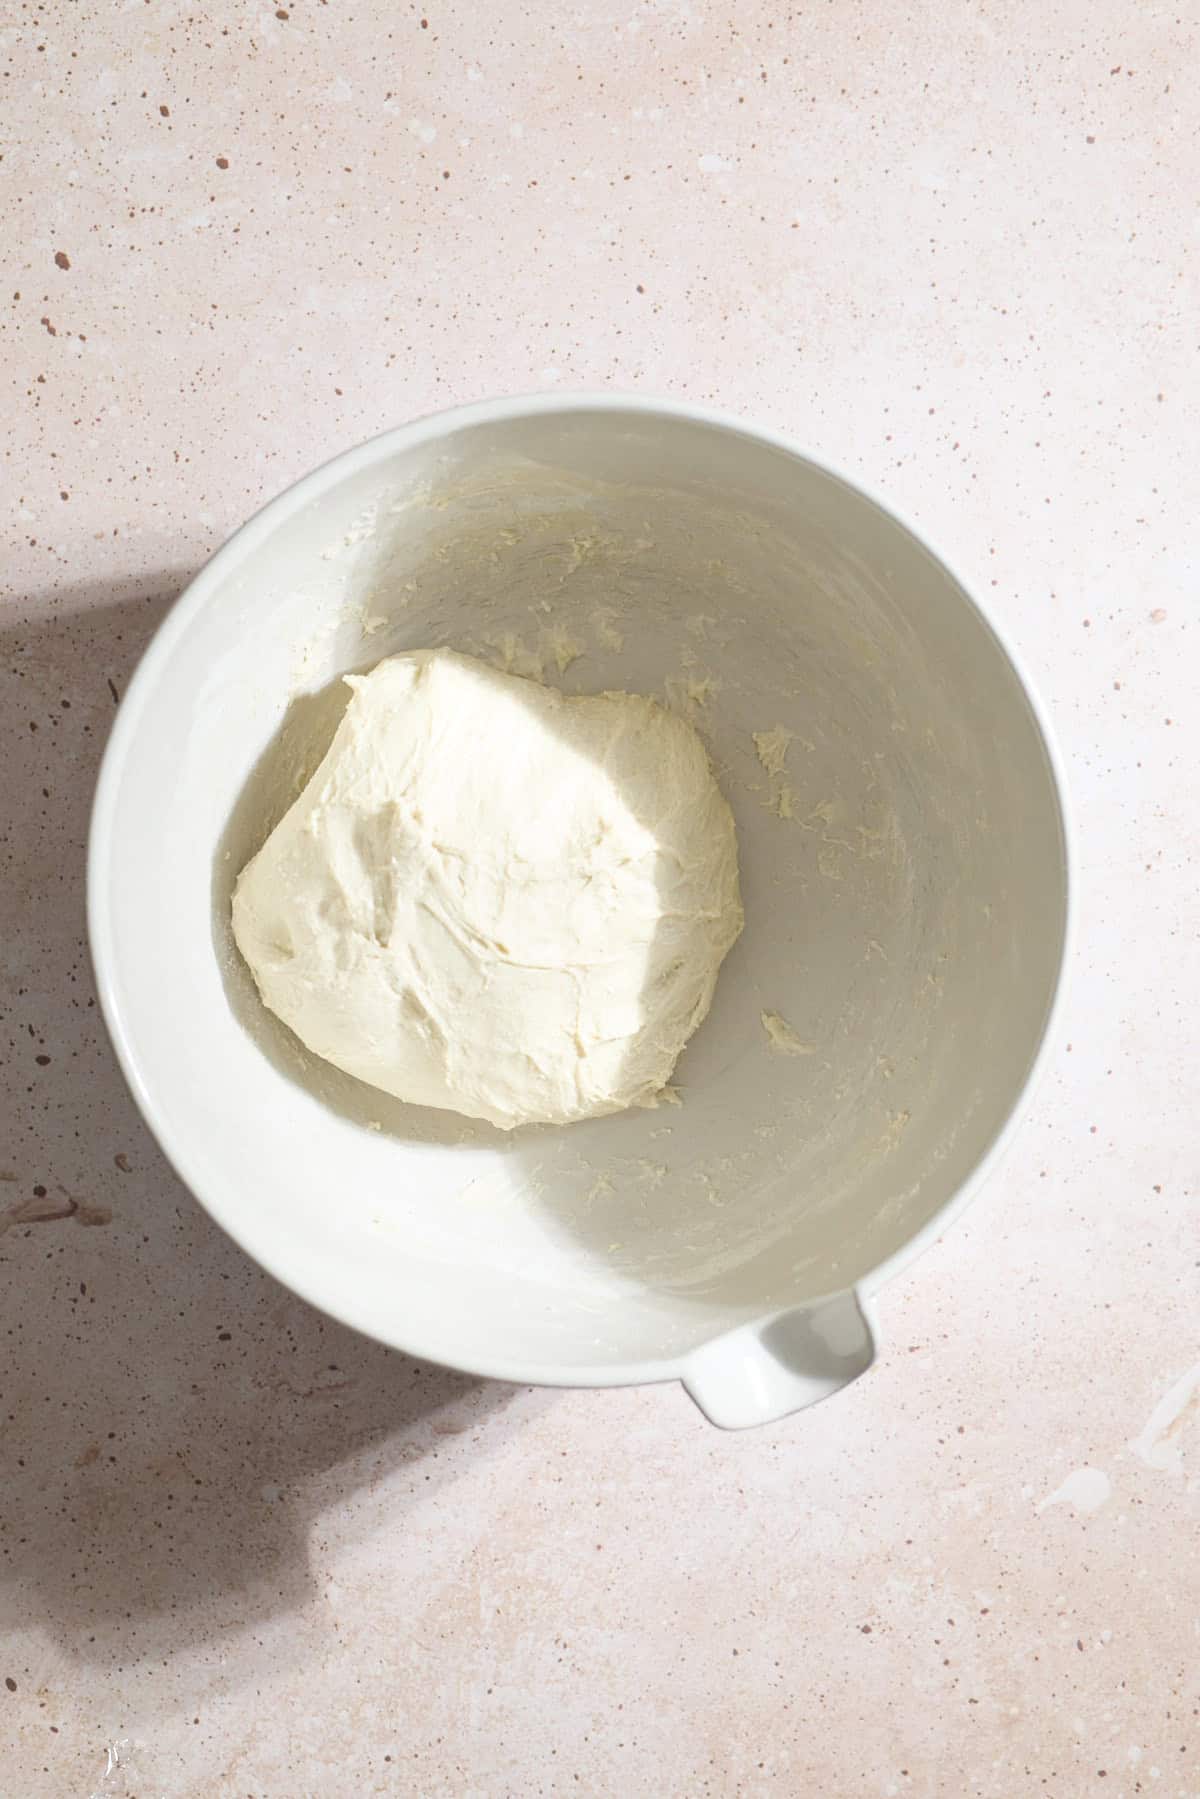
Dough after the second set of stretch and folds.
Dough after the third set of stretch and folds.
How to Know When Bulk Fermentation Is Done
For this recipe, the bulk fermentation (the first rise), will likely take anywhere from 2-5 hours. This depends largely on the temperature of your dough and the temperature of your room / environment. Dough will rise quicker in a warm environment and slower in a cold environment.
Rather than watch the clock, watch your dough to check if bulk fermentation is done. Check on your dough every hour as it is rising. Bulk fermentation is done when:
- The dough is jiggly - When you shake the bowl, the dough jiggles quite a bit. You don't need to force it, the jiggle is there and noticeable!
- You see air bubbles forming on the surface of the dough - These are not pinprick bubbles, but true, poppable bubbles in the dough.
- The dough is slightly domed
- The dough is not sticky to the touch
- The dough might be pulling away from the bowl - This doesn't always happen and depends on a few other factors, so it's not my favorite method to judge bulk fermentation. But you may notice that your dough easily pulls away from the sides of the bowl.
Common Sourdough Challenges
- Dough isn't rising: If you feel like your dough isn't rising as quickly as you'd want, one issue might be your room temperature. Move it to a warmer location. This might be:
- On top of a dough proofing mat or seed sprouting mat (this is one of my favorite ways to slightly warm up dough).
- Next to a sunny window. You don't want the dough to be in direct sunlight, but it will be warmer next to a sunny spot.
- On top of your stove while your oven is on. I do this if my house is feeling very cold in the winter.
- Next to your stovetop while you're doing some other baking / cooking.
- A warmer spot in your house.
- Dough is overproofed: Even if you think your dough is overproofed, I highly recommend shaping and baking it anyhow. You never know how something might turn out and you might be pleasantly surprised!
- If a loaf doesn't seem like it's in your future, use the dough to make focaccia.
- Dough is underproofed: When in doubt, give it more time! Even if the dough is rising slowly, it is still rising. Do your best to let it rise in a warm area, but give it as much time as it needs.
I will be working on a few more sourdough guides to answer some questions. Stay tuned for more!
Storage
Room Temperature Storage: Store your bread at room temperature in a bread bag or a paper bag. If you don't have either available, store the loaf with the cut-side down on the cutting board. The bread will be best the first day, and will start to harden after that.
- If your bread is getting hard, you can revive it in the microwave for a few seconds, or use it for toast. It's also great for making French toast!
Freezer Storage: Sourdough bread also freezes well. You can freeze the whole loaf or slices, depending on how you'd like to use it. Let the loaf cool fully, then place it in a freezer-safe bag. Freeze for up to 3 months. When ready, let the bread thaw at room temperature before slicing.
Recipe FAQs
It's not needed (I recommend using a large mixing bowl and a dough whisk or wooden spoon), but you can use one if you want to.
No. The equipment listed is definitely helpful, but not crucial. If you're new to sourdough, or you're not sure if you want to fully commit, I suggest getting one or two things at a time (start with a dough whisk and a dough scraper) rather than getting many things at once.
If you want to, yes! To do so, after the dough is in the banetton for the second rise, put it in the refrigerator overnight. In the morning, preheat your oven (with your Dutch oven), score the loaf, and bake it straight from the refrigerator. You don't need to let the dough come to room temperature.
More Sourdough Bread Recipes


If you tried this Easy Sourdough Bread or any other recipe on my website, please leave a ⭐ star rating and let me know how it went in the comments below. I'd love to hear from you! Happy Baking!
Easy Sourdough Bread (Same-Day Recipe)
Equipment
- Dough whisk optional
- Bowl scraper optional
- Round banetton optional
- Bread lame optional
Ingredients
- 150 grams active sourdough starter
- 275 grams warm water
- 425 grams bread flour
- 9 grams kosher salt
Instructions
- Suggested timing: 8am feed your starter, 12pm make the dough, 5pm shape the dough, 8pm bake the loaf. See notes below for more on timing!
- Feed your starter. About four hours before making your dough, feed your sourdough starter at a 1:1:1 ratio. Cover and let rest at room temperature until bubbly and doubled in size.
- Mix the dough. In a large mixing bowl, combine 150 grams active sourdough starter and 275 grams warm water. Mix with a dough whisk (or a wooden spoon). Add 425 grams bread flour and 9 grams salt. Mix with the dough whisk until a shaggy dough forms, and no dry spots remain.
- Optional but recommended: Wet your hands (so the dough doesn't stick to your fingers too much) and transfer the dough to an unfloured work surface. Complete several sets of slap and folds, slapping the dough onto the counter, pulling towards yourself, and folding the dough in half. Repeat for 2-3 minutes until the dough seems to be holding its shape better. This is helping to knead the dough and build gluten structure early on during bulk fermentation. Avoid adding more flour. Wet your hands as needed to prevent the dough from sticking. Return the dough to the mixing bowl (or a clean mixing bowl). Cover with plastic wrap and let rest in a warm area for 30 minutes.
- Stretch and fold #1: After the initial 30-minute rest, complete 3 sets of stretch and folds spaced 30-45 minutes apart (this timing doesn't need to be exact). Wet your hands and scoop under one side of the dough. Pull that side of the dough up, then fold the dough in half on itself. Rotate the bowl 90°, then repeat until you've made 4-5 stretch and folds all the way around the bowl. Cover the bowl and let rest in a warm area. If adding inclusions, add those during this first set of stretch and folds.
- Stretch and fold #2: Repeat the same stretch and folds. The dough should be starting to feel smoother, less shaggy, and hold its shape better. Cover the bowl and let rest in a warm area.
- Stretch and fold #3: Repeat the same stretch and folds. Again, the dough should feel smoother, not shaggy, and hold its shape better. At this point, it should also pass the windowpane test: when you stretch a small piece of dough, it should stretch to the point that light can pass through it without the dough ripping. If it doesn't seem like it's there yet, repeat this process for a fourth set of stretch and folds. Cover the bowl and let rest in a warm area for the remainder of the bulk fermentation.
- Finish bulk fermentation. Bulk fermentation is done when the dough is jiggly, there are bubbles appearing on the surface of the dough, and it is domed. The dough should also no longer be sticky when you touch the surface. The dough will have increased in size by about 50%.This will likely be about 4-5 hours after you have mixed the dough, but will vary based on your room temperature. Check your dough once every hour. If it needs more time, give it more time! Bulk fermentation is the most important part of making a good loaf.
- Shape the loaf. Turn the dough onto an unfloured work surface. You may need to use a dough scraper to loosen the dough from the bowl. Fold one side of the dough into the center, then rotate the dough and repeat, making 4-5 folds around the dough, until the dough feels sturdier. Turn the dough over so the seam is on the bottom. Cup your hands around the dough and pull the loaf towards you, dragging on the countertop to create surface tension. Rotate the dough and repeat, slowly tightening the dough. Repeat until you have a smooth, round ball. Transfer the dough to a lightly floured banneton (the loaf will be upside down with the seam facing up). Cover and let rise. If you do not have a banetton, you can transfer the dough to a bowl lined with a clean kitchen towel and dusted with flour.
- Second rise. Let the dough rise in the banneton for 1-3 hours until it passes the poke test. The dough should spring back slowly when poked with your finger.If the dough rebounds quickly, it's underproofed (give it more time). If the dough doesn't rebound, it's overproofed (bake it anyhow!). This rise is much less important than the bulk fermentation.
- Preheat the oven to 450℉ with your Dutch oven inside. Place a baking sheet on the bottom rack of your oven to prevent the bottom of your loaf from burning.
- Score and bake the loaf. Carefully remove the warmed Dutch oven from your oven. Flip the dough from your banneton onto a piece of parchment paper (or a bread sling). Use a bread lamé or a sharp knife, score the loaf by cutting a seam down the length of the loaf for steam to escape while baking. The cut should be about ¼-½ inch deep.Don't overthink this! And frankly, if you'd rather not score the loaf, the bread will create its own natural seam as it bakes.Transfer the parchment paper and dough into your hot Dutch Oven. Cover with the lid and bake covered for 25 minutes. Remove the lid and bake uncovered for an additional 15-20 minutes until browned and crusty.
- Cool. Remove the loaf from the Dutch Oven and let cool fully on a cooling rack (at least 1 hour) before slicing.
Jessica Vogl says
This recipe is very forgiving, and a great way to get started with baking sourdough!